Google Analytics is the perfect tool for gathering insights into your store performance. It can help you judge the efficacy of your marketing endeavors, understand customer behavior, and identify growth opportunities.
Have you invested in Magento SEO services to boost search engine rankings and drive traffic to your website? In that case, you can add Google Analytics to your Magento 2 store to track performance, measure growth, and get the best returns on your investment.
But to leverage it effectively, you need to know:
— Which generation of Google Analytics to use,
— How to set it up correctly,
— How to verify it is working.
This article will introduce you to the latest version of Google Analytics and shows you how to add it to your Magento 2 store in order to gain deep insights into its performance.
Universal Analytics vs. Google Analytics 4: Which one should you choose?
Google released the latest generation of analytics called Google Analytics 4 (GA4) on the 14th of October 2020. If you’ve configured Google Analytics on your Magento store before that date, you’re using the older generation called Universal Analytics (UA).
Although both versions are currently valid, there are significant differences between the two.
UA tracks user interactions, or events, using hits. These hits are further categorized based on the interaction, such as page hits, ecommerce hits, and event hits. Every hit type has a category, action, and label associated that makes it unique.
In contrast, GA4 has no category, action, or label associated with interactions. There is no distinction between hit types, and all hits are categorized as events and classified into one of the following four categories:
1. Automatically collected events,
2. Enhanced measurement events,
3. Recommended events,
4. Custom events.
Of these, the automatically collected and enhanced measurement events do not require a unique code for tracking and can be logged using the base GA4 property code installed on your website or app.
In contrast, recommended and custom events require custom code on your website pages. These are recommended for ecommerce store properties and require additional configuration for use.
This article only addresses how to add the base Google Analytics 4 tracking code to Magento 2. To add recommended and custom event tracking functionality using GA4, you might need some help from a Magento 2 development company to implement a custom JavaScript component on your store.
Now, if you’re wondering which one you should use for your store, the answer to that question is: it depends. If you’re looking for basic insights such as conversion and page view tracking, you can use Universal Analytics. But if you want granular insights into customer behavior and store performance, you should use Google Analytics 4.
GA4 allows you to leverage the power of machine learning to improve your business performance. You can use Google’s advanced data models to gain deep insights into your store performance.
GA4 helps you identify customer demand, anticipate future customer actions, and understand why some customers spend more than others on your website. Those insights can help you target demographics more effectively to grow your business.
We strongly recommend using GA4 on your Magento store to ensure you’re ready for the future of analytics. GA4 is the future of Google Analytics. It gives you customer-centric measurements and granular controls for personalization.
Add Google Analytics to Magento 2
The process of adding Google Analytics to your Magento 2 store varies slightly depending on the property type you set up.
This tutorial demonstrates the procedure to create and add a GA4 property to your Magento 2 store. We’ll teach you how to add your Google Analytics global site tag to Magento 2 without an extension.
Note: Before you begin, make sure you’re logged in to your Magento admin panel as an administrator and have a valid Gmail account.
Step 1: Create a Google Analytics property
Make sure you’re signed in to your Gmail account so we can set up a Google Analytics account and create an analytics property. You can use this link to sign up for a Google Analytics account if you don’t have one yet.
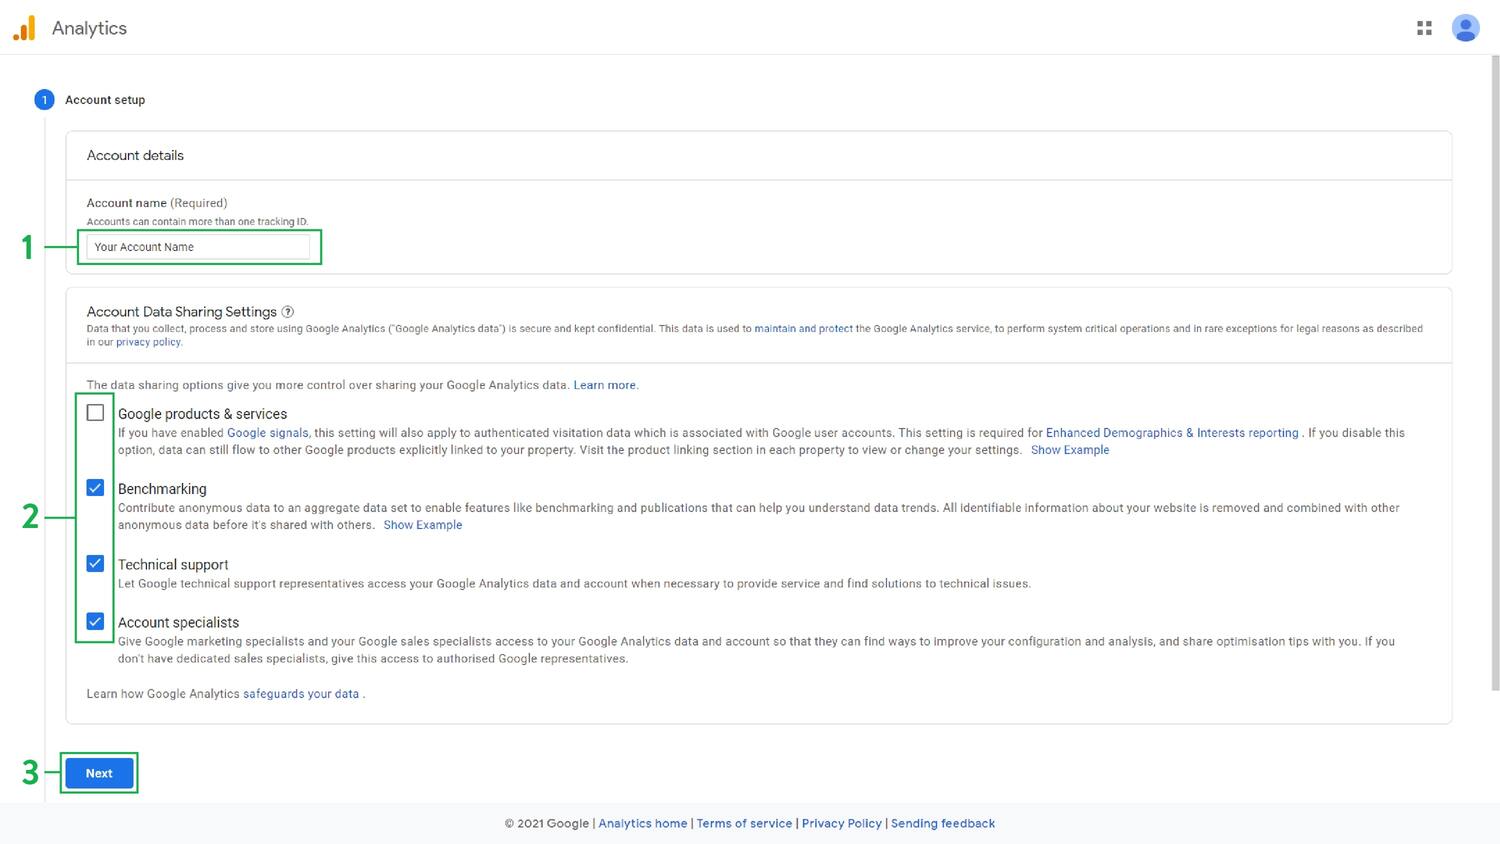
Account setup
1. Enter an account name of your choice. It doesn’t have to be your website name. You can use your company name if you like.
2. Configure your data sharing preferences by choosing what data is shared with Google. If you don’t know which options to choose, we recommend reading about Google’s data-sharing settings.
3. Once you’ve entered your preferences, click “Next” to start creating a Google Analytics property.
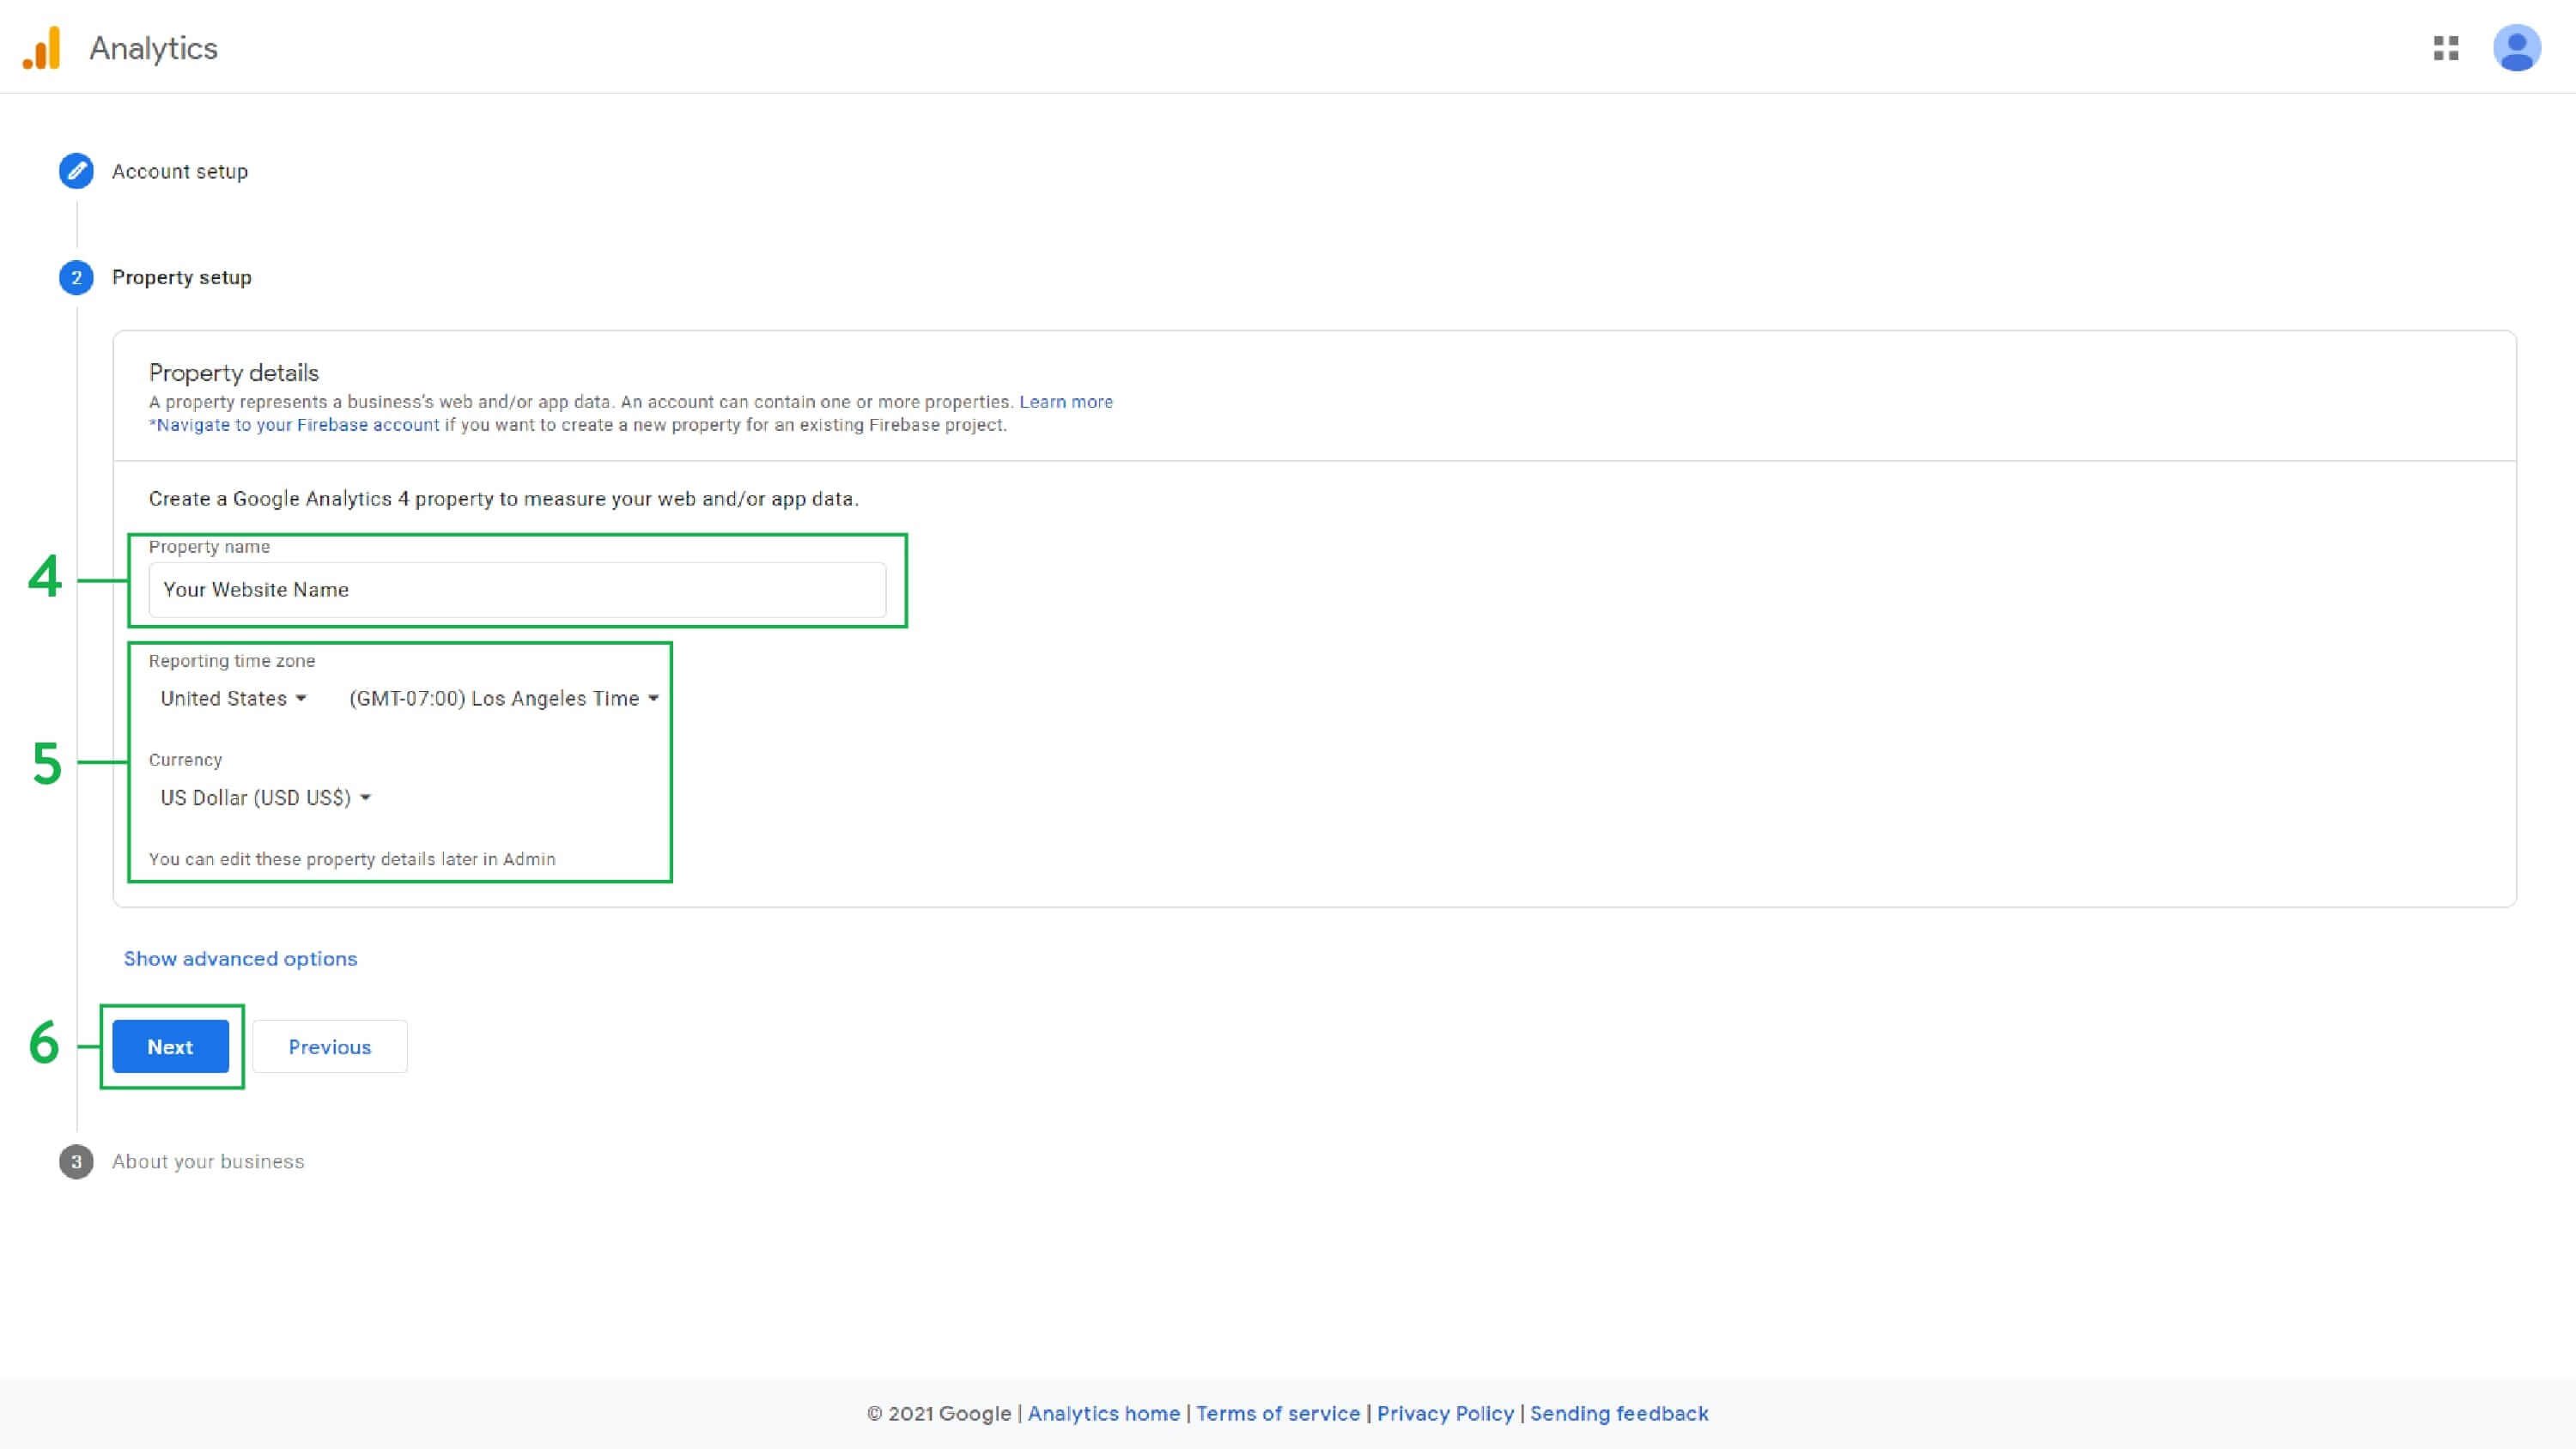
Property setup
The default property type for all new Google Analytics properties is GA4. However, you can also create a UA property in addition to or instead of the GA4 property. For this tutorial, we’ll only create a GA4 property.
4. Assign a name to your property. You can use your website name here.
5. Configure the reporting time zone and currency for your store.
6. Click “Next” to proceed.
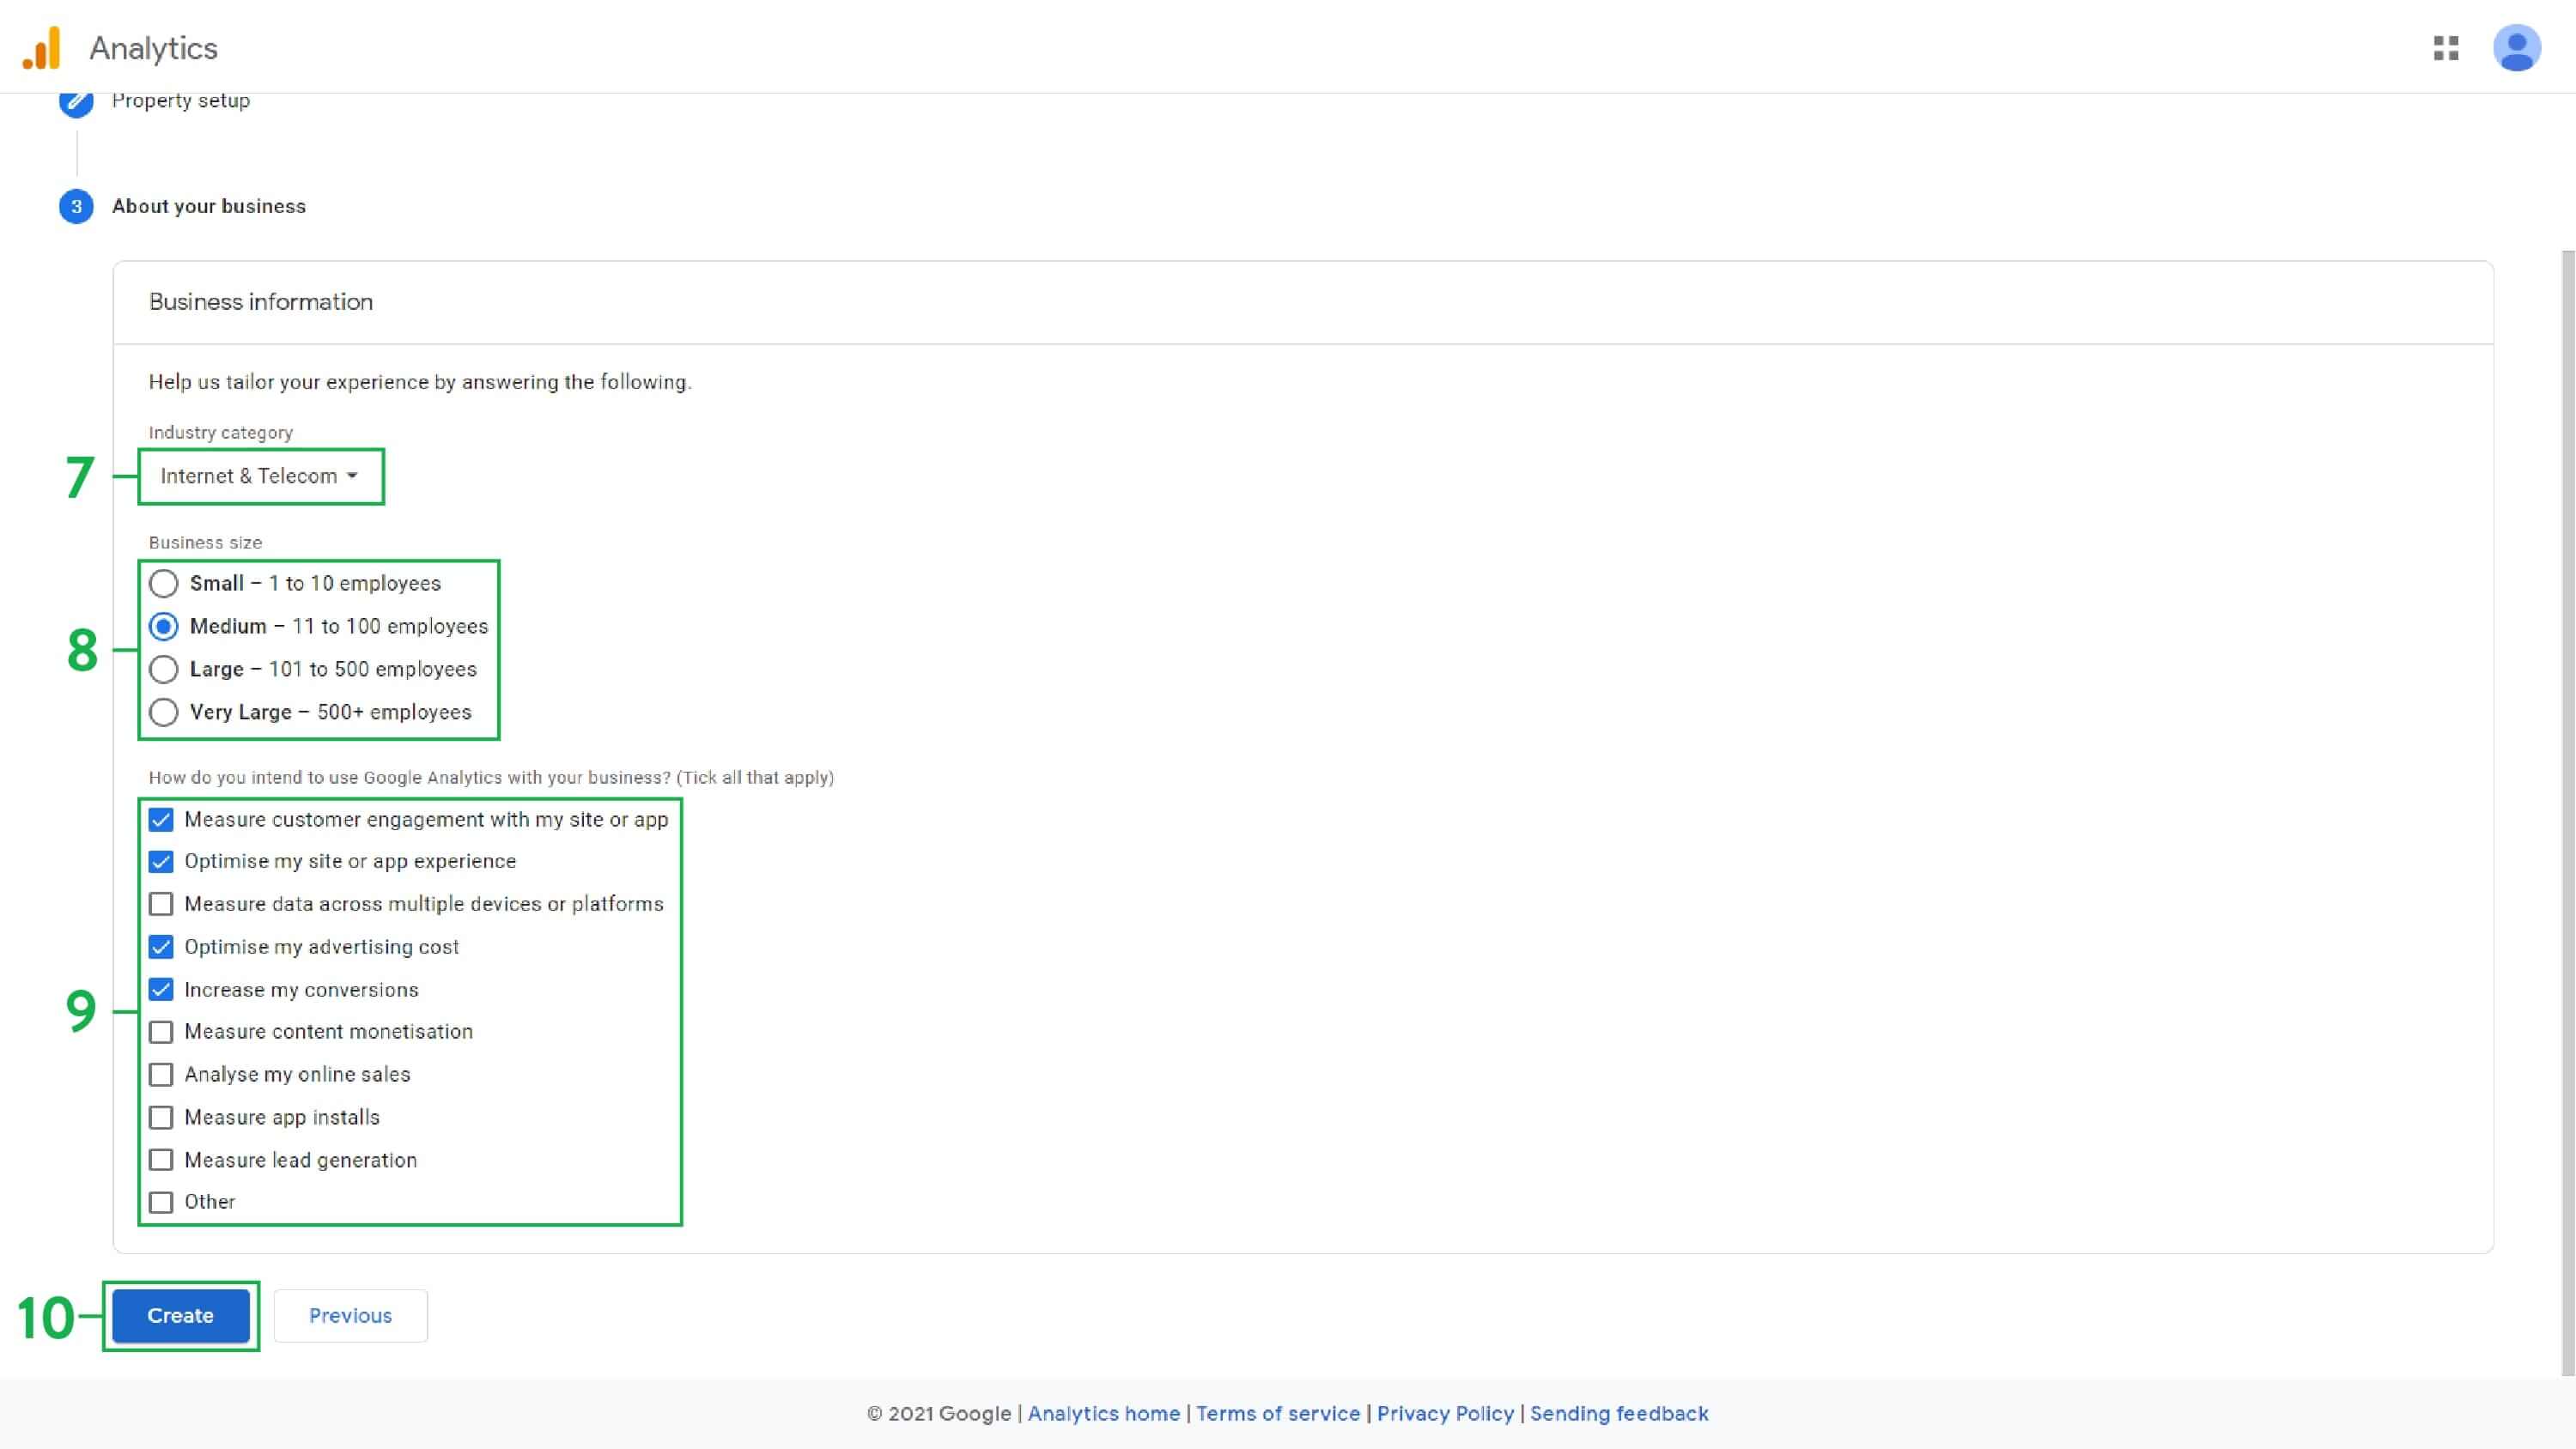
Business information
Next, Google will ask you to provide some information about your business to tailor its offerings to your needs.
7. Select your industry from the dropdown. If you can’t find a relevant industry, you can choose “Other.”
8. Select your business size.
9. Select the options that match how you plan on using Google Analytics for your business.
10. Click on “Create” to finish the setup.
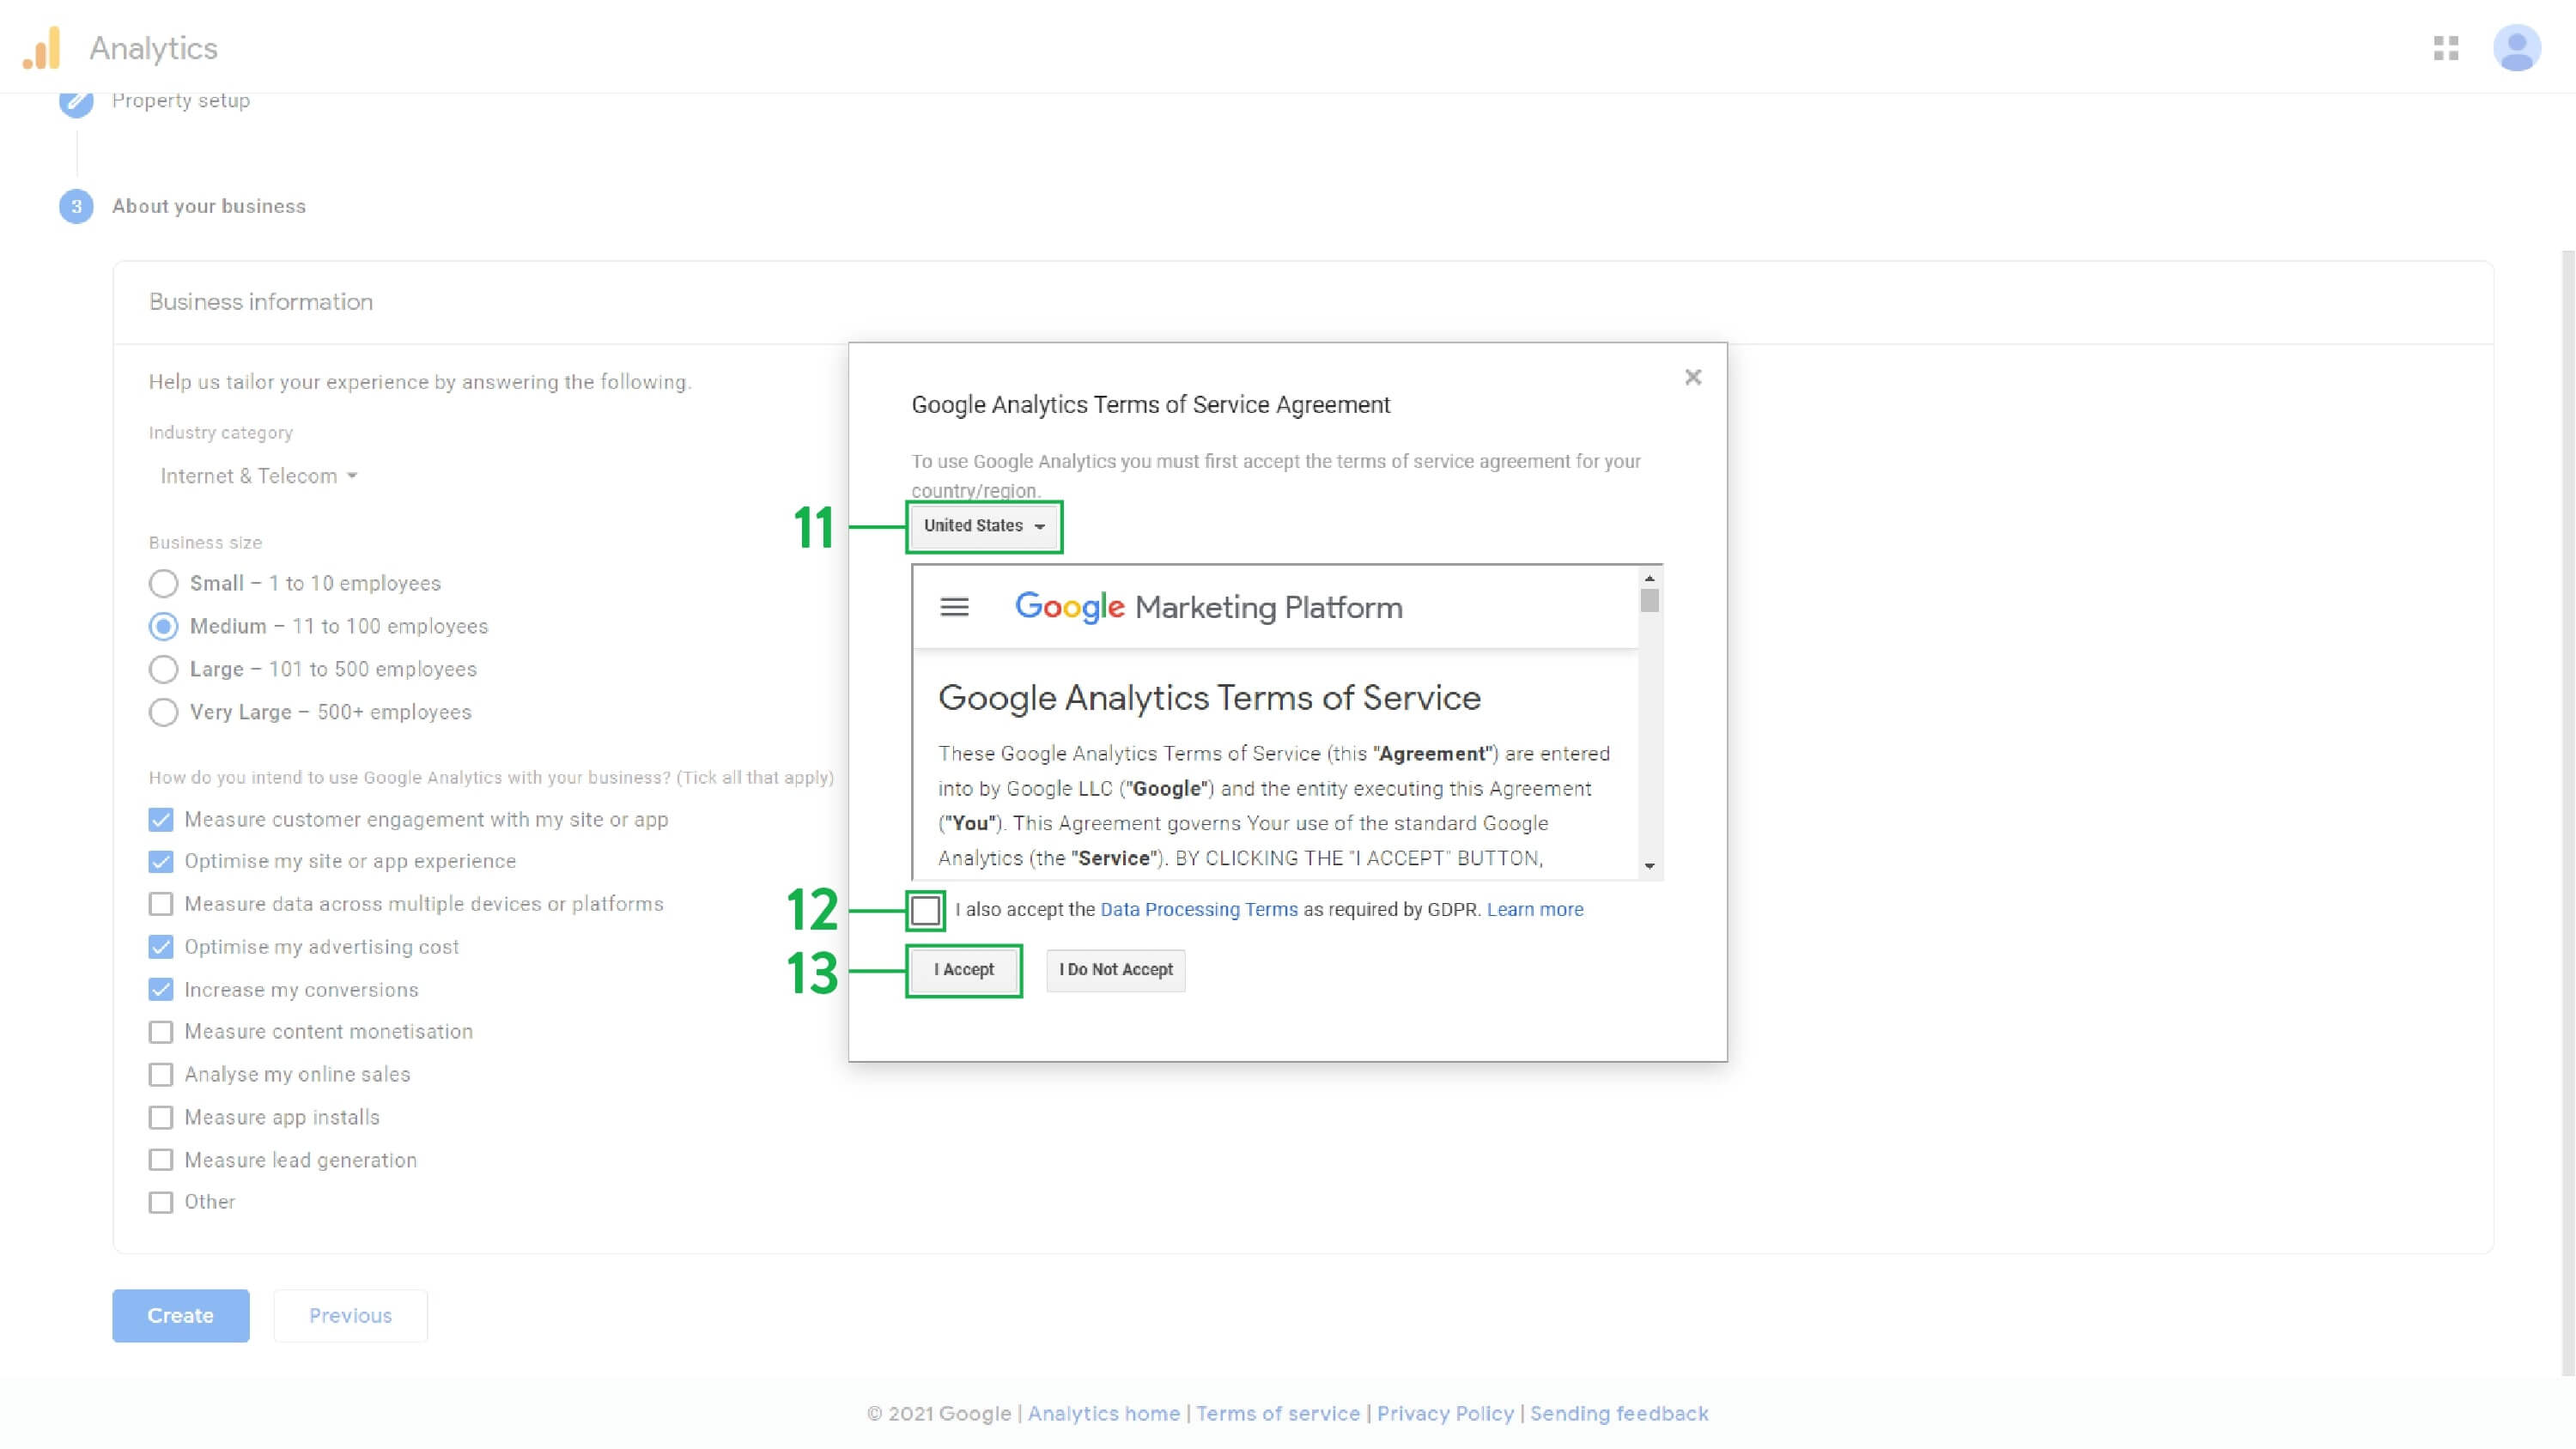
After this, you will see a pop-up with the Google Analytics Terms of Service Agreement.
11. Select your country from the dropdown.
12. (If applicable to your region) Accept the data processing terms by clicking on the small checkbox.
13. Click on “I Accept” to proceed.
Note: If you run a multistore website, make sure you go over these steps to create a separate property for each store view.
Step 2: Generate the global site tag
Once you’ve finished setting up your Google Analytics account, you will be redirected to the admin section of your account to create a data stream and a global site tag for your website or app.
The global site tag helps track conversions on your website. Suppose you’re running a Google Ads campaign with conversion tracking. In that case, this tag will inform Google when it should track a conversion such as an order, a phone call, or a signup.
Let’s create a global site tag for our website and add it to our Magento store.
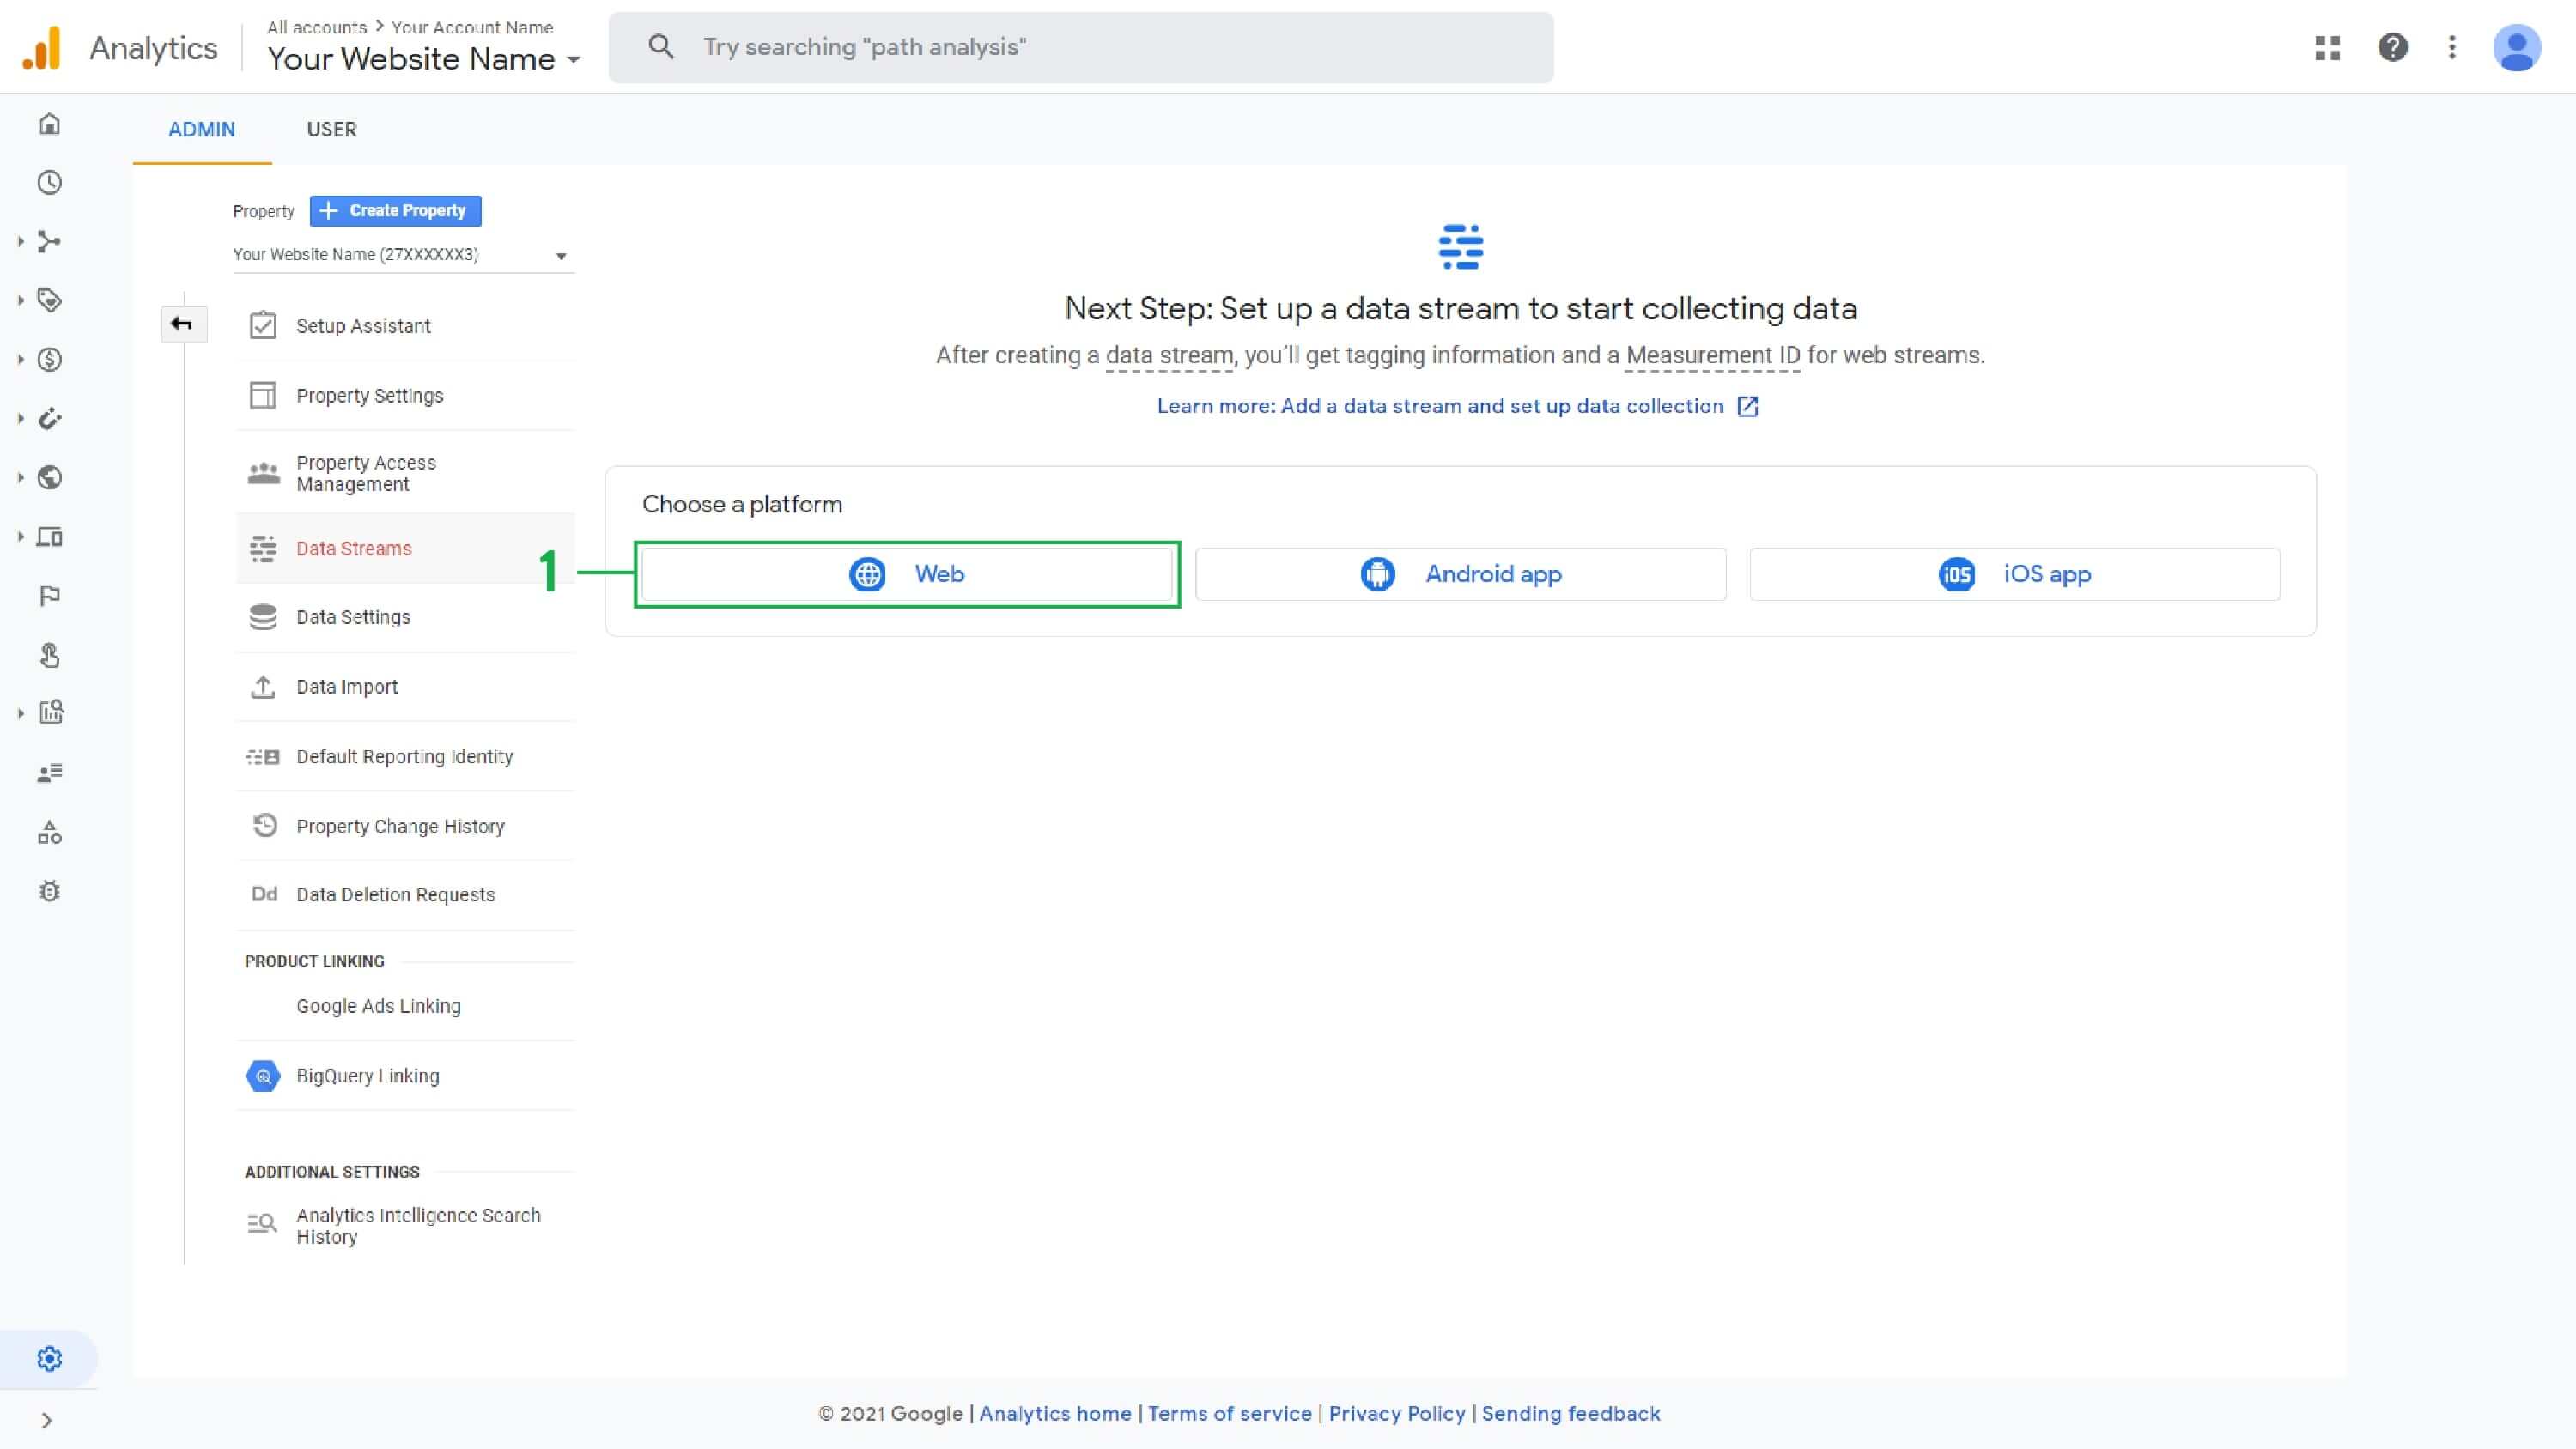
1. Choose the platform for which you wish to configure the site tag. For your Magento store, choose “Web.”
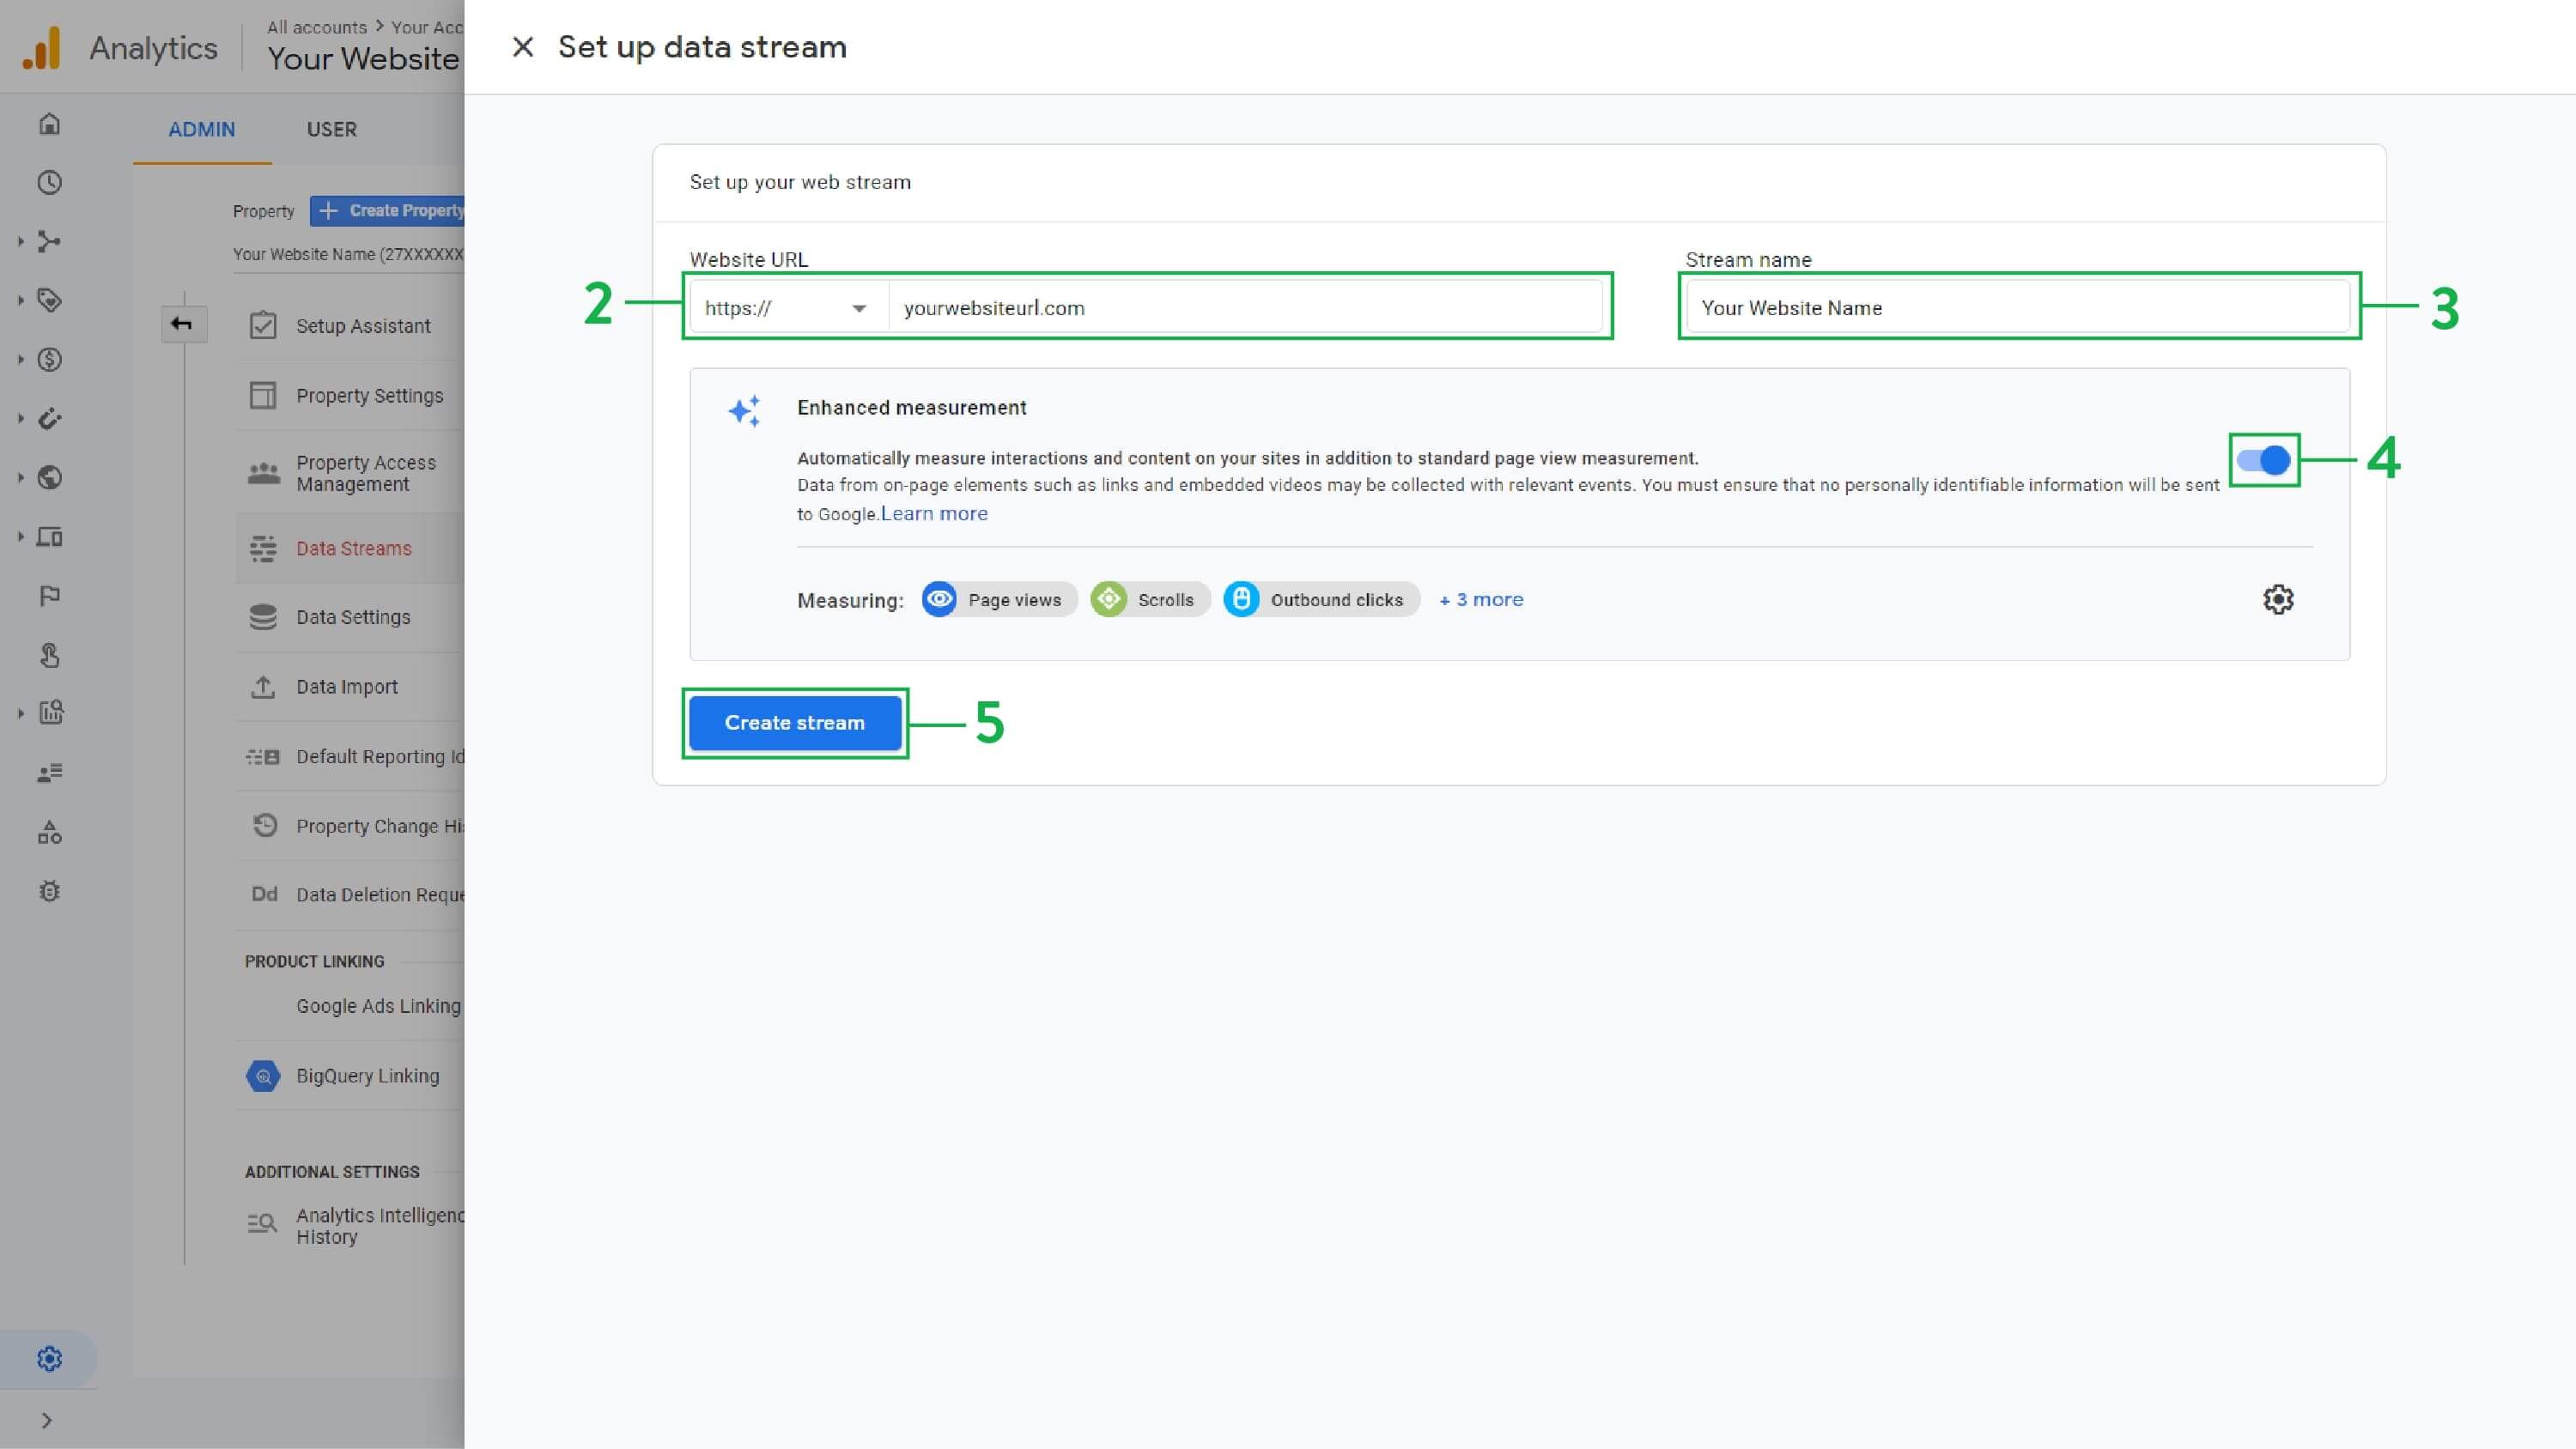
2. Enter your website URL (excluding “https://”).
3. Enter a stream name to help you identify it in your Google Analytics account.
4. Optionally, you can enable enhanced measurement to track multiple metrics such as scrolls, outbound clicks, site search, video engagement, and file downloads in addition to page views. Alternatively, you can disable it if you only wish to track page views.
5. Once you’ve made your choice, click “Create Stream” to generate the tag.
Note: If you’ve enabled Enhanced measurement, make sure no personally identifiable information is sent to Google from your website.
Step 3: Add the analytics code to Magento 2
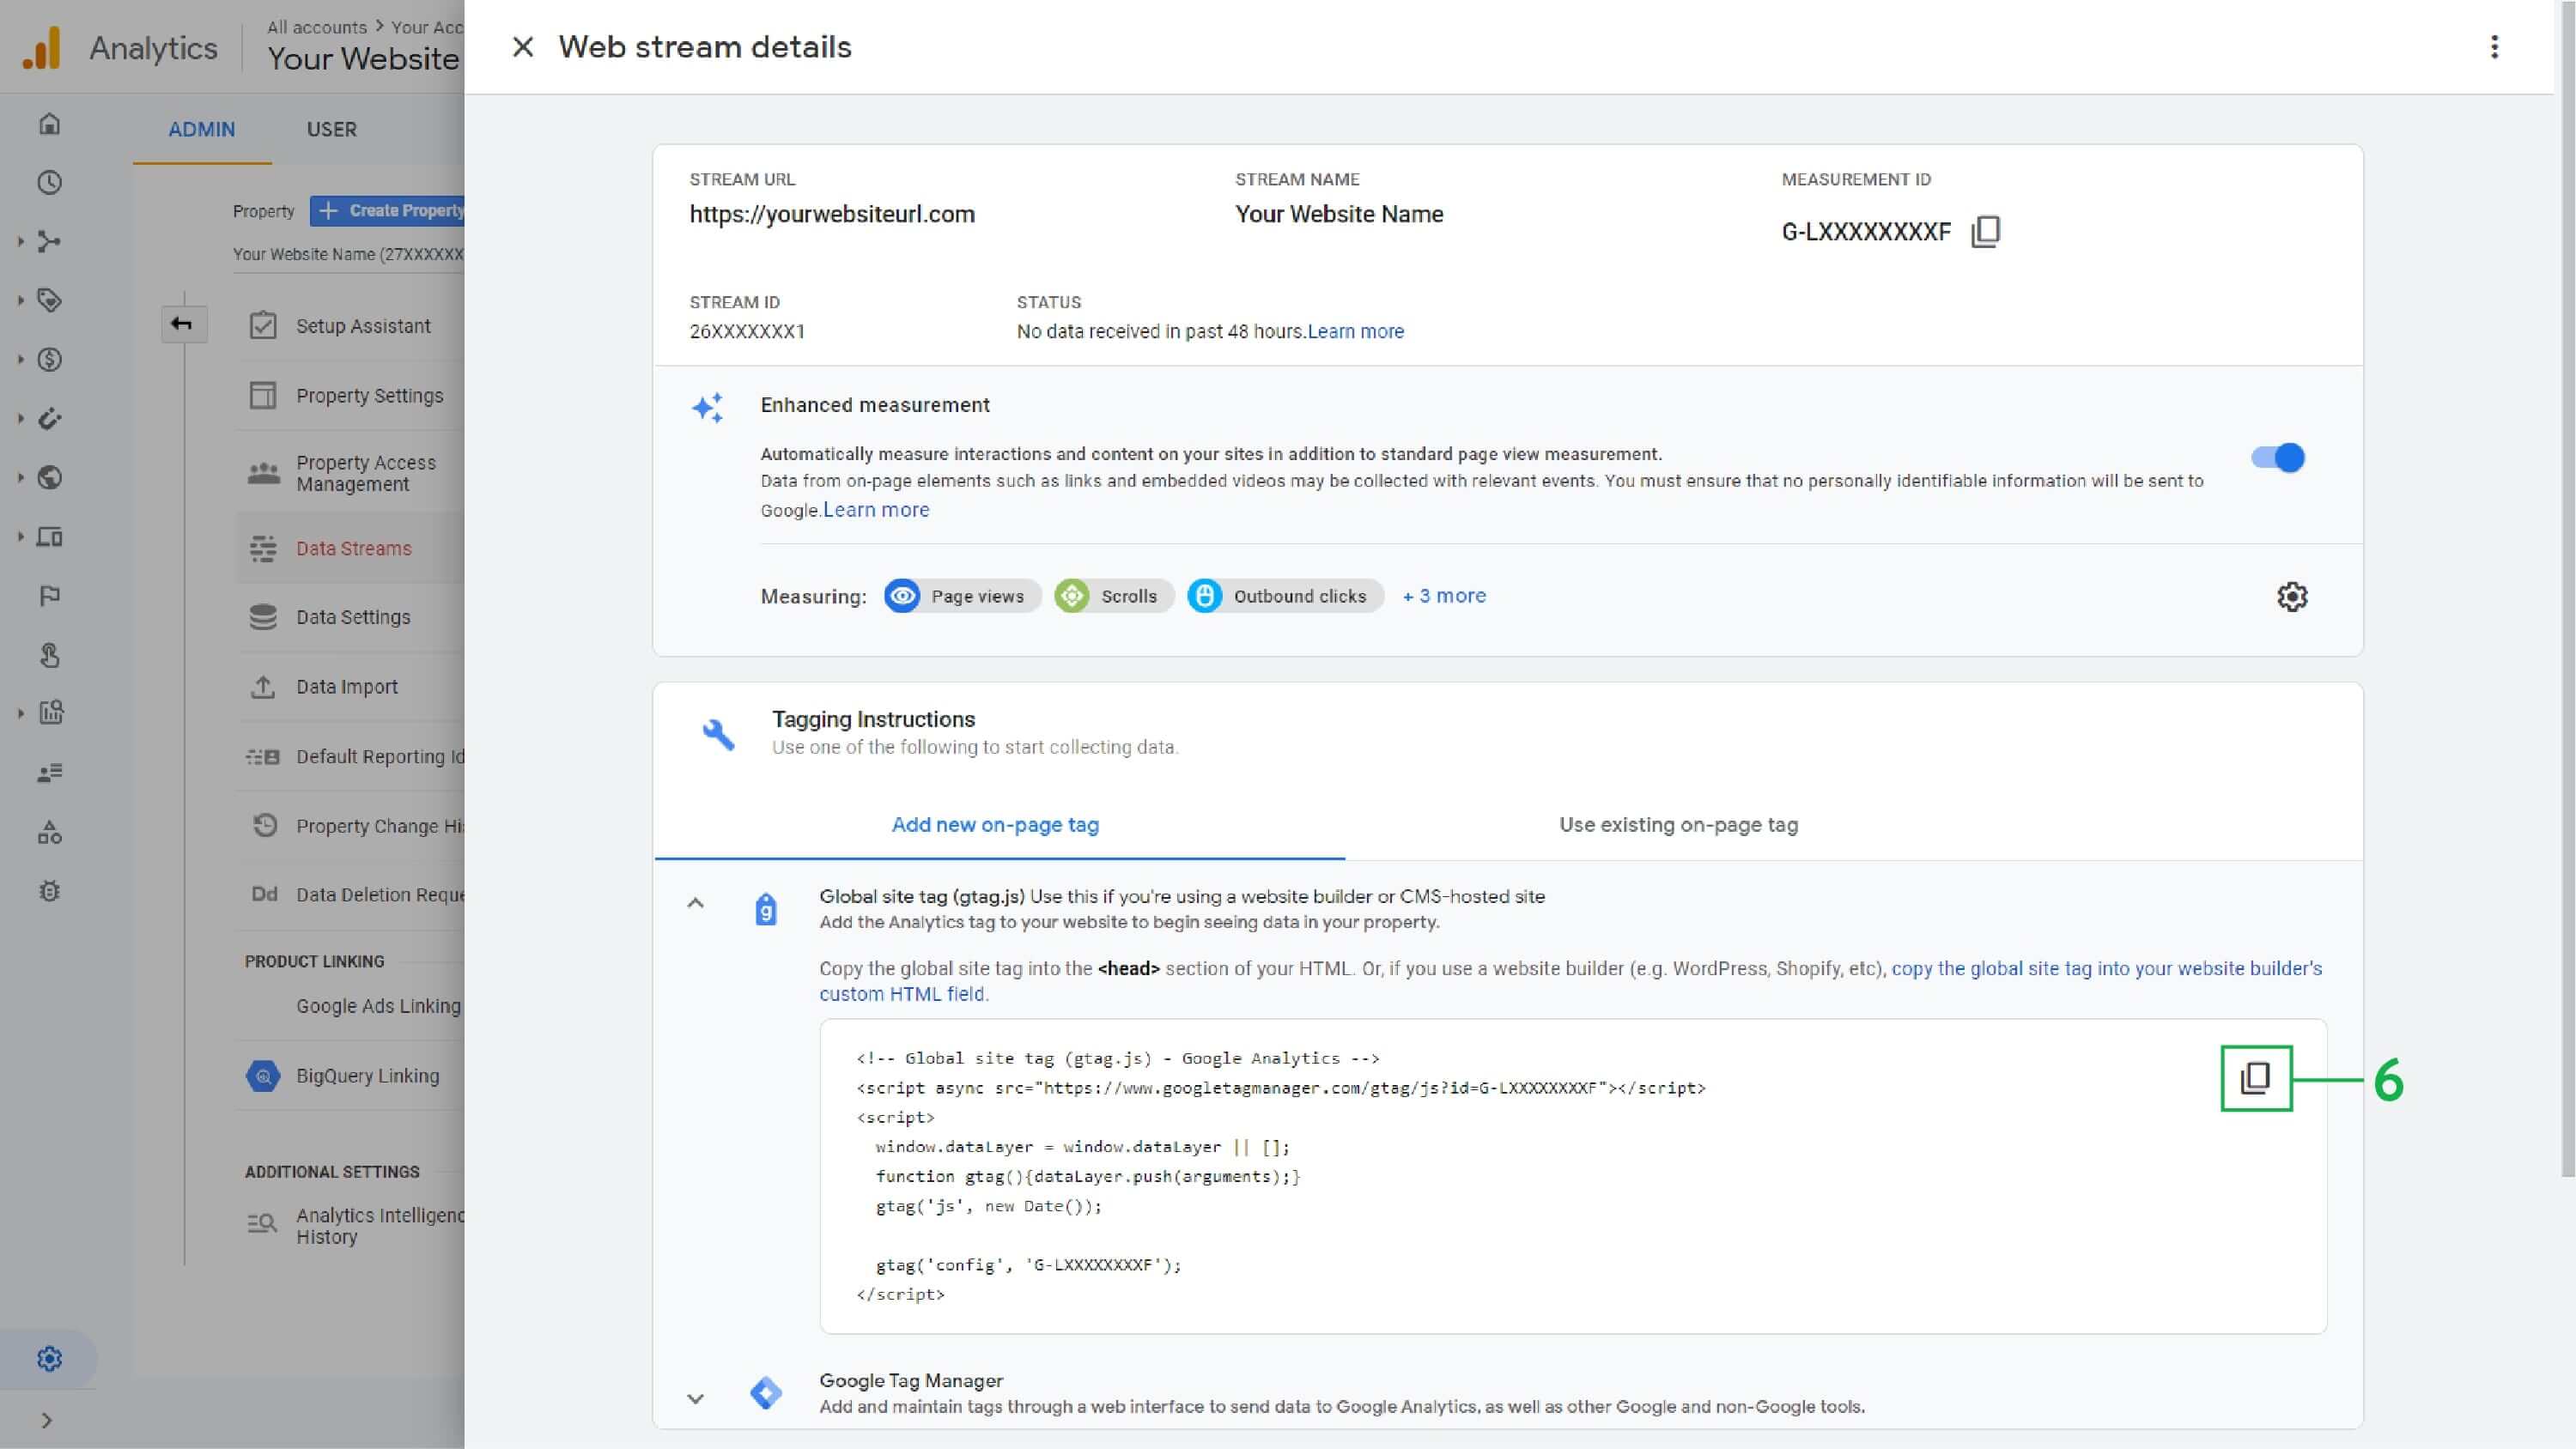
Now it’s time to copy your site tag to Magento. Once you click “Create stream,” a Global Site Tag will be generated, and you will see a new section appear with some tagging instructions.
6. Copy the global site tag under Tagging Instructions > Add new on-page tag > Global site tag (gtag.js.)
Next, head over to the Magento admin panel so we can add the global site tag to the <head> section of your store.
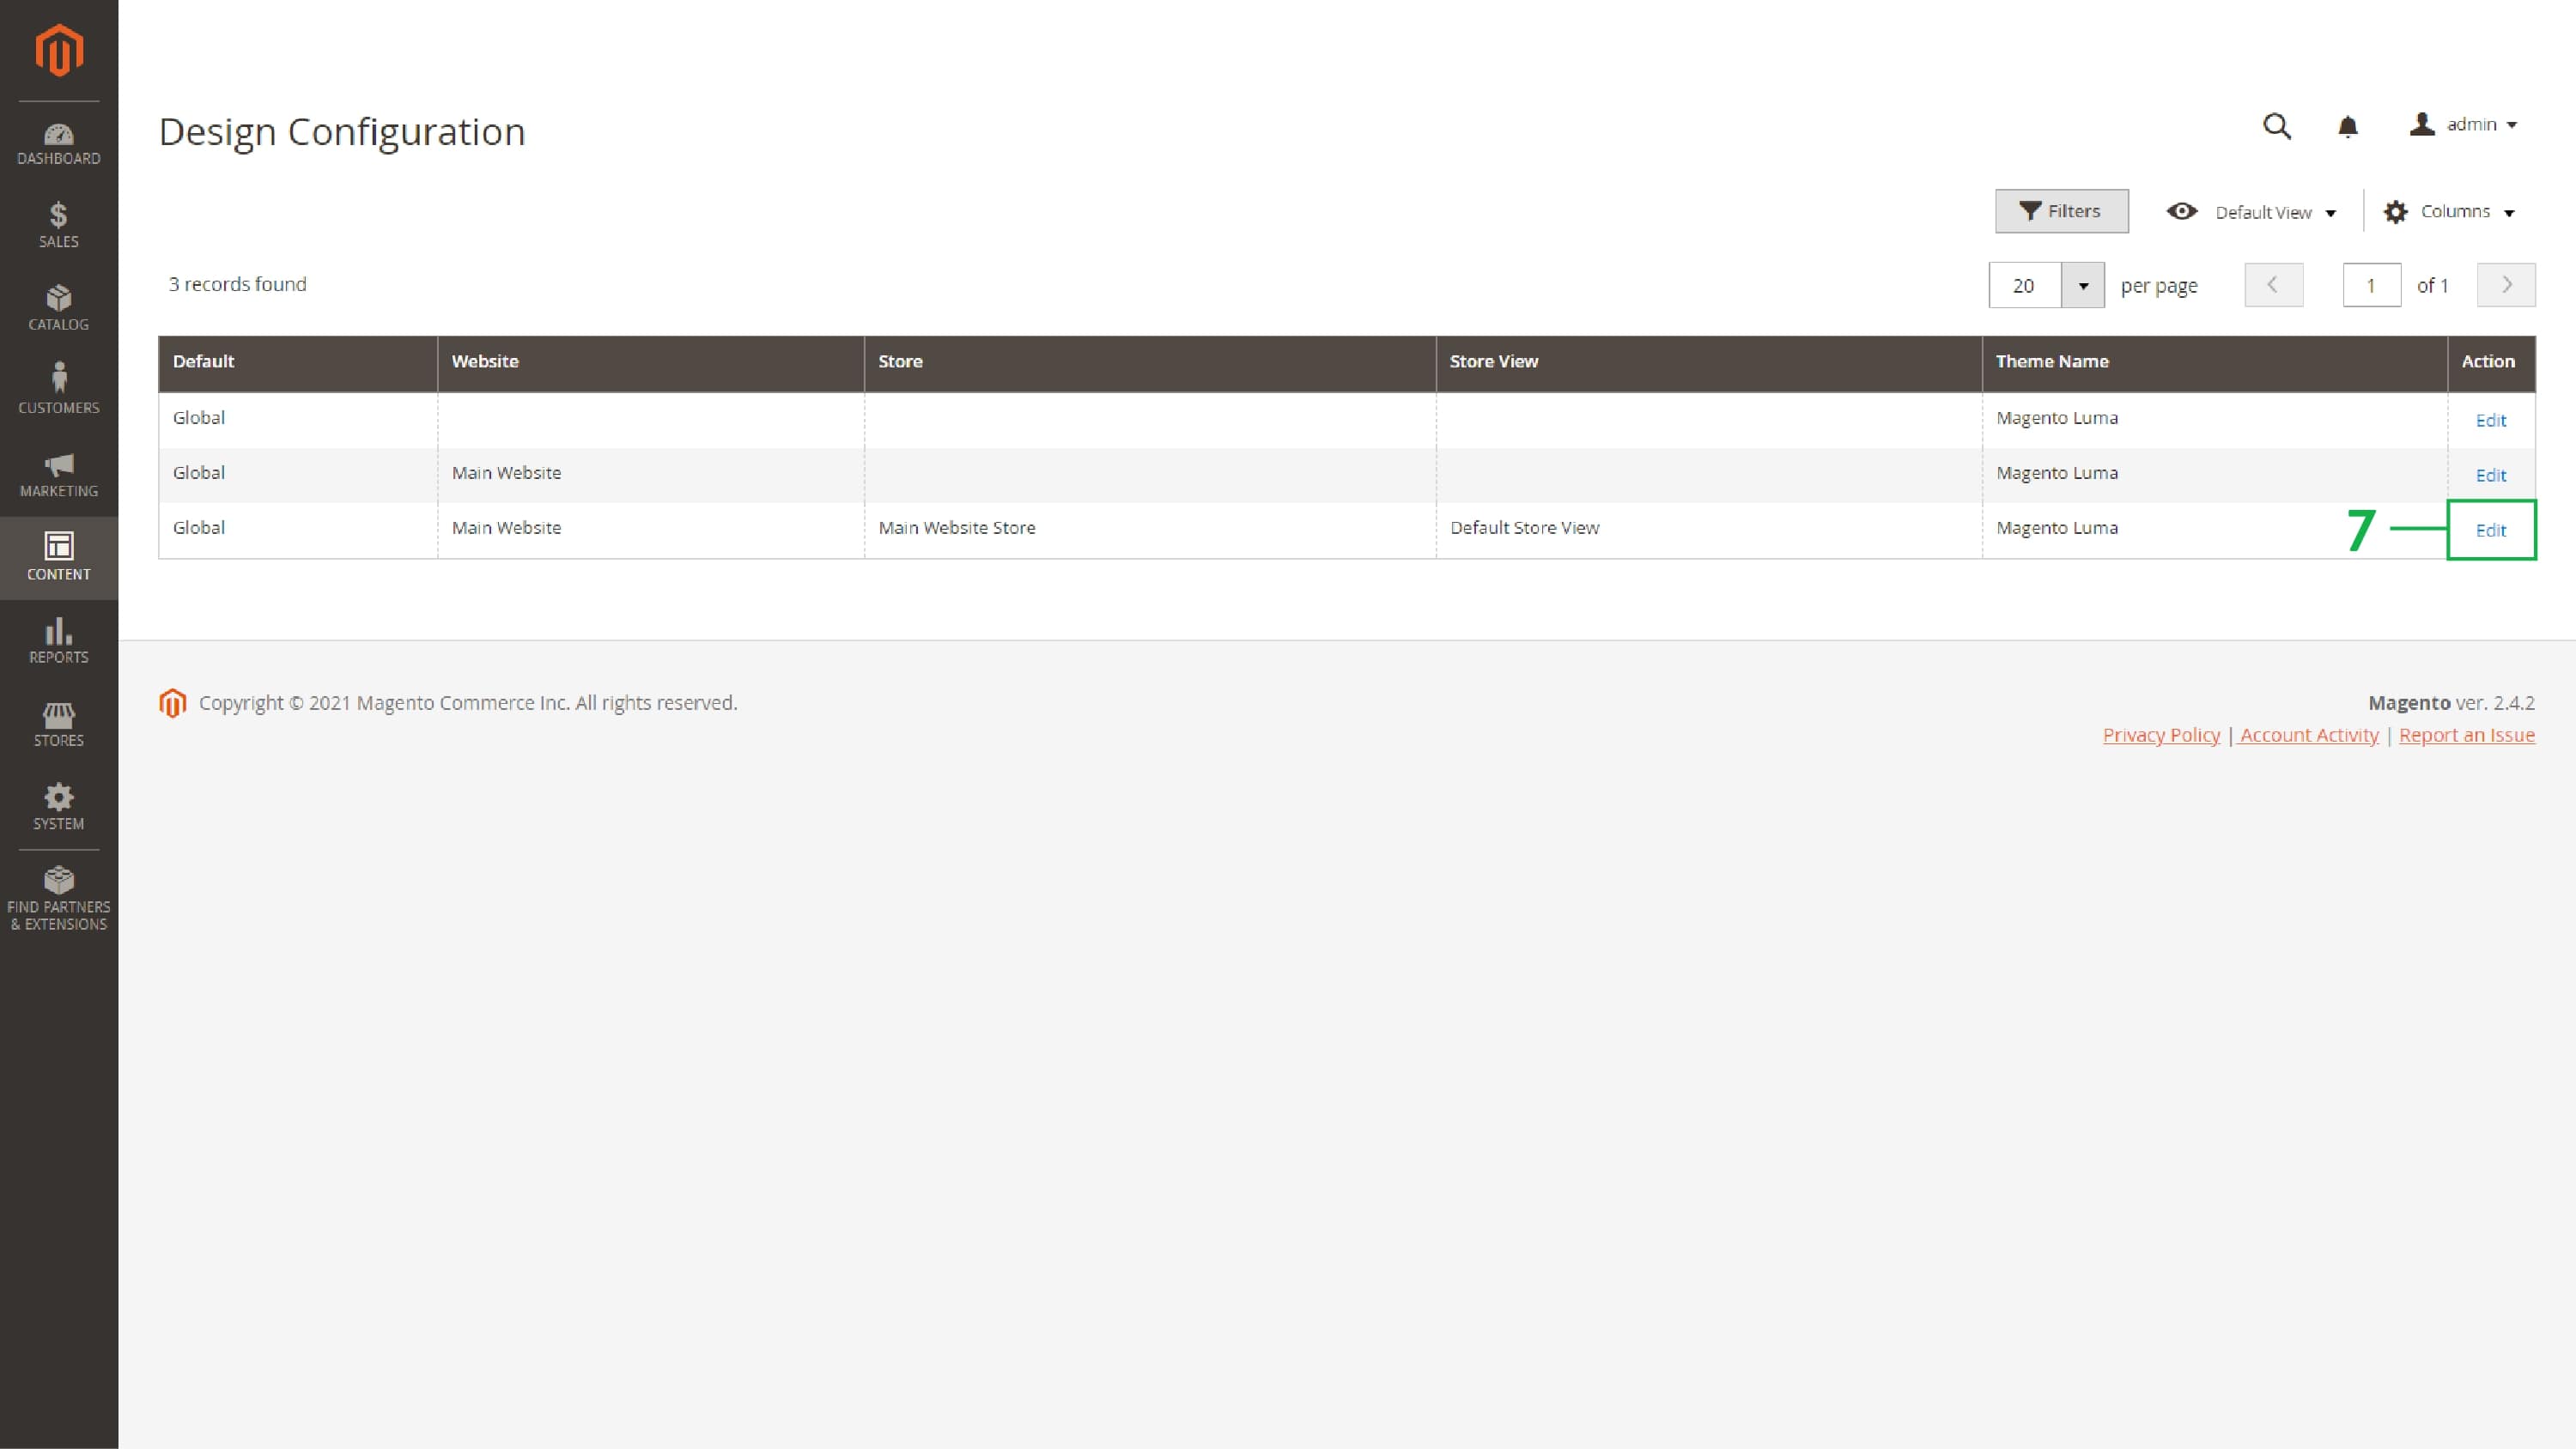
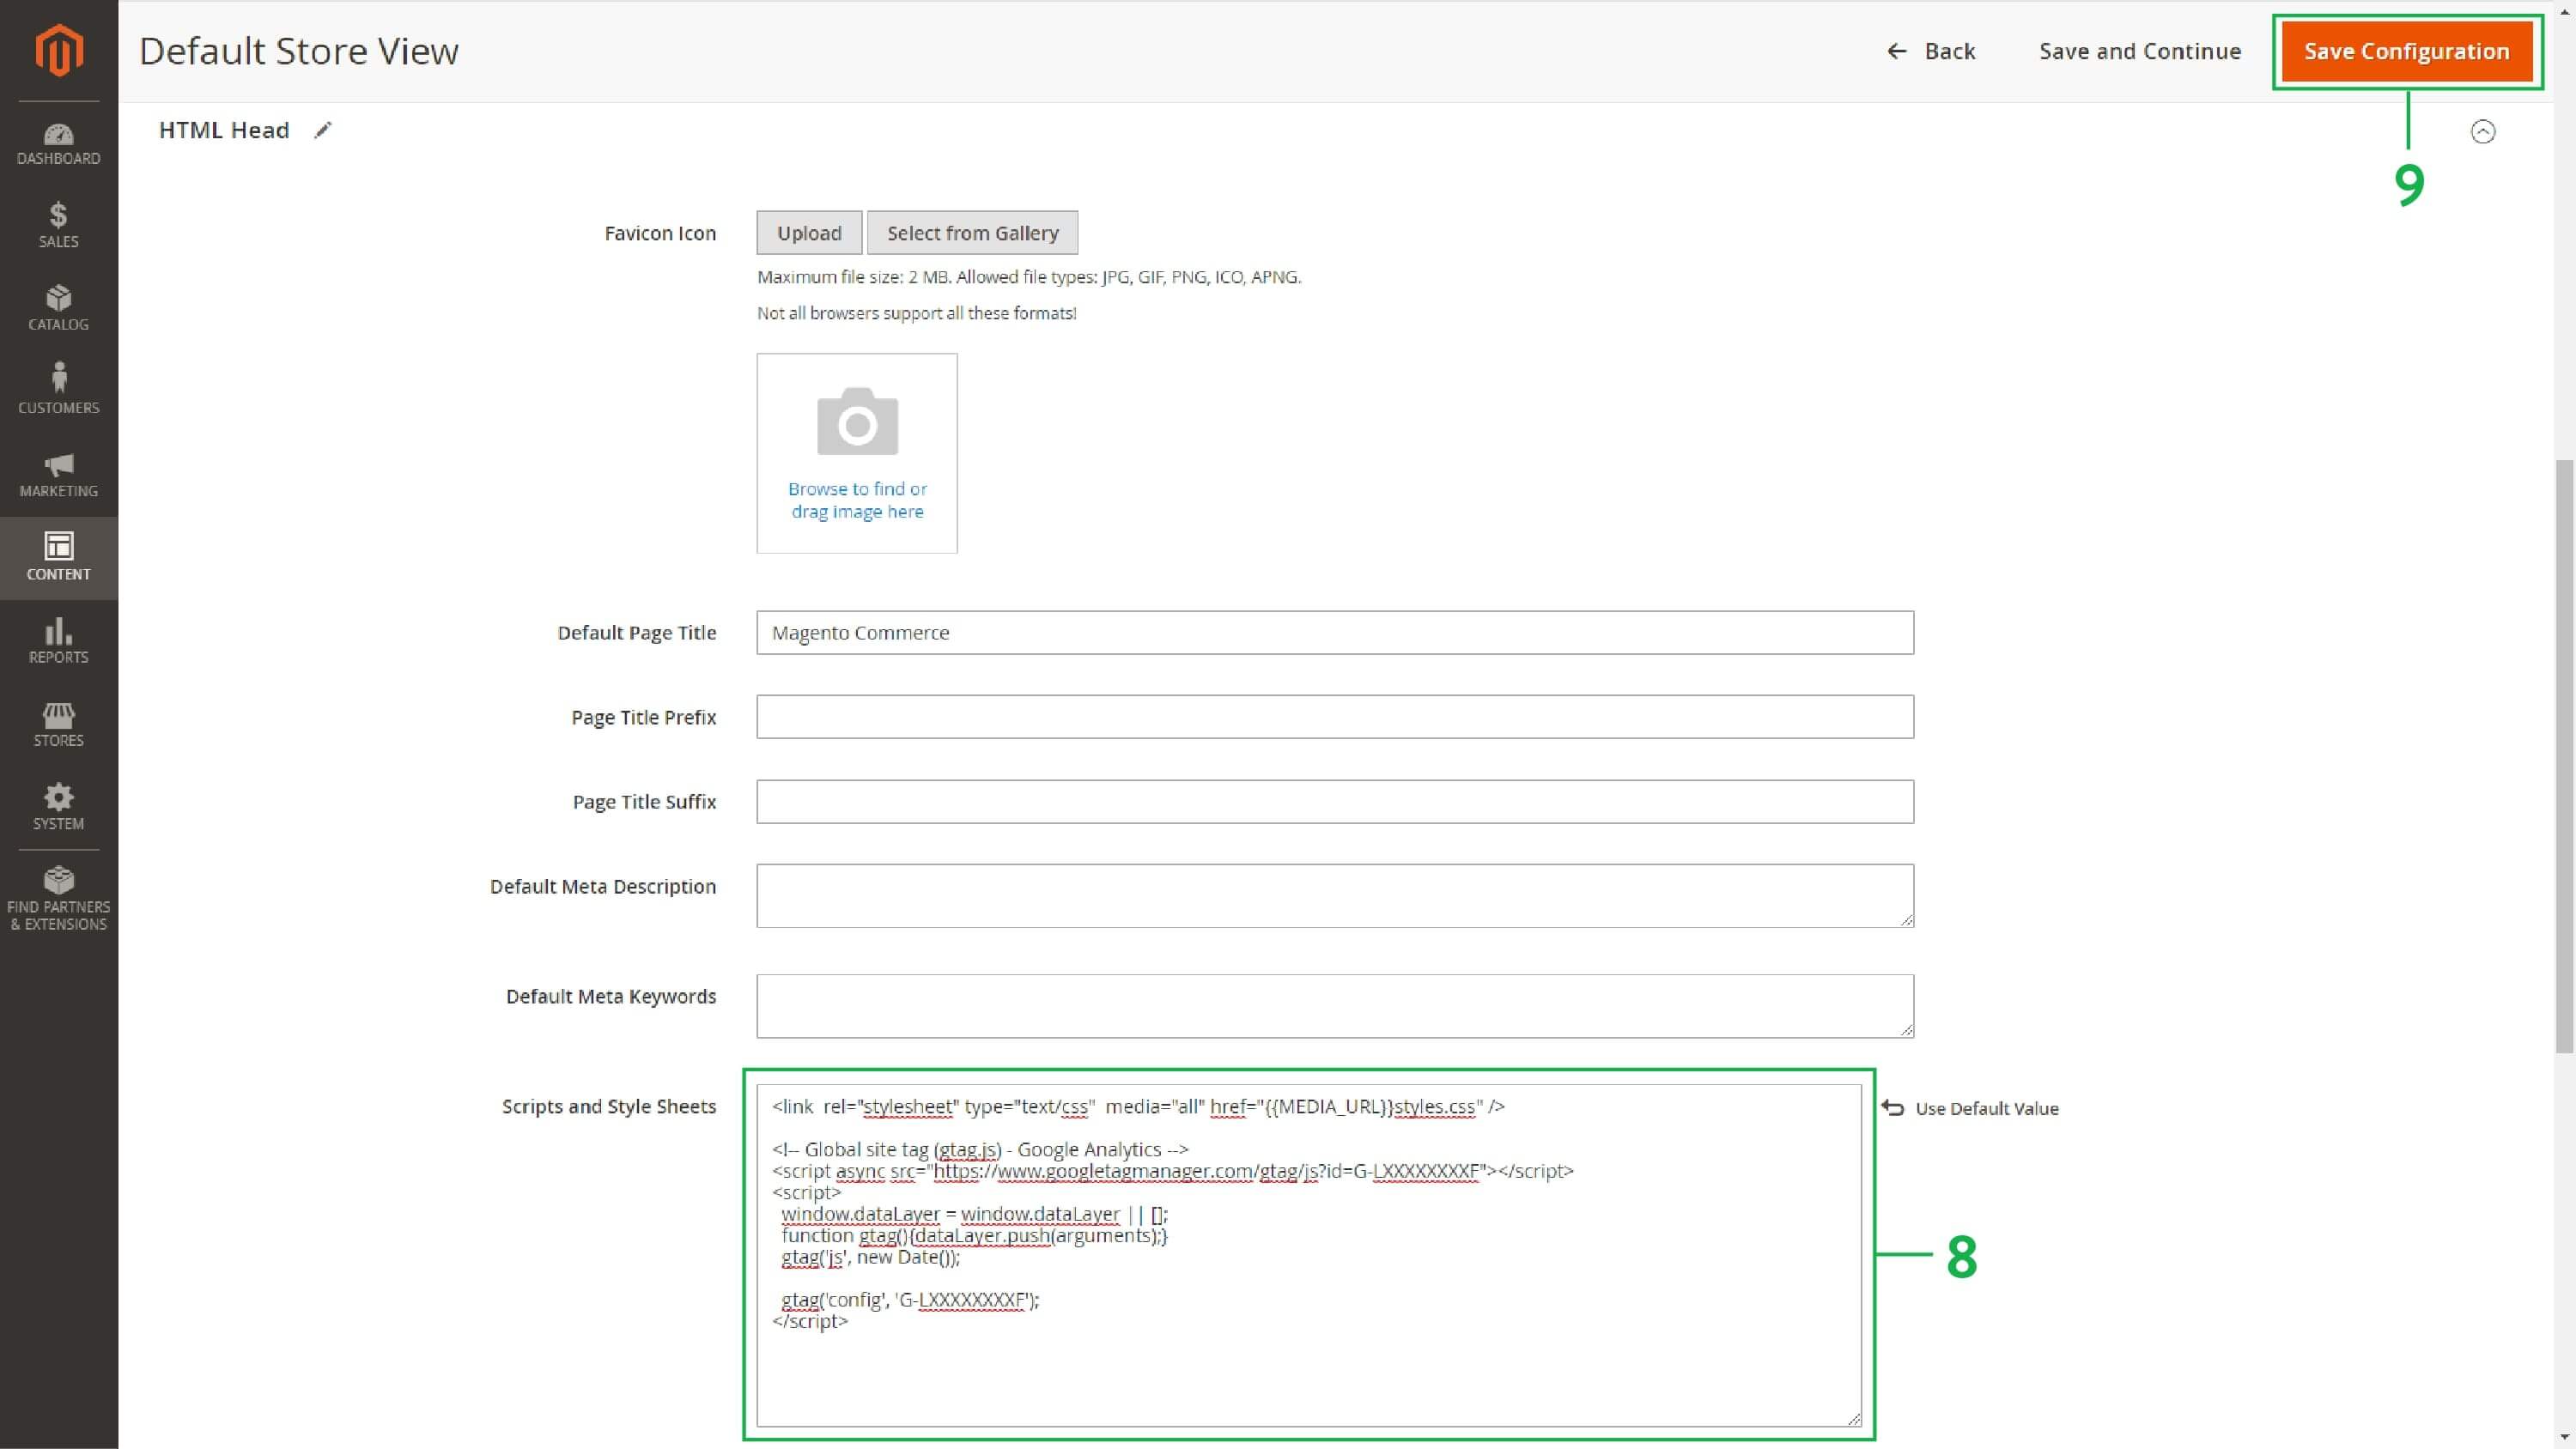
7. Navigate to Content > Design > Configuration and click “Edit” for your preferred store view. We’ve selected the third option, i.e., “Default Store View.” However, if you operate a single website, you can apply it globally as well.
8. Under the HTML Head, paste your global site tag code into the “Scripts and Style Sheets” section.
9. Click on “Save Configuration” to apply the changes.
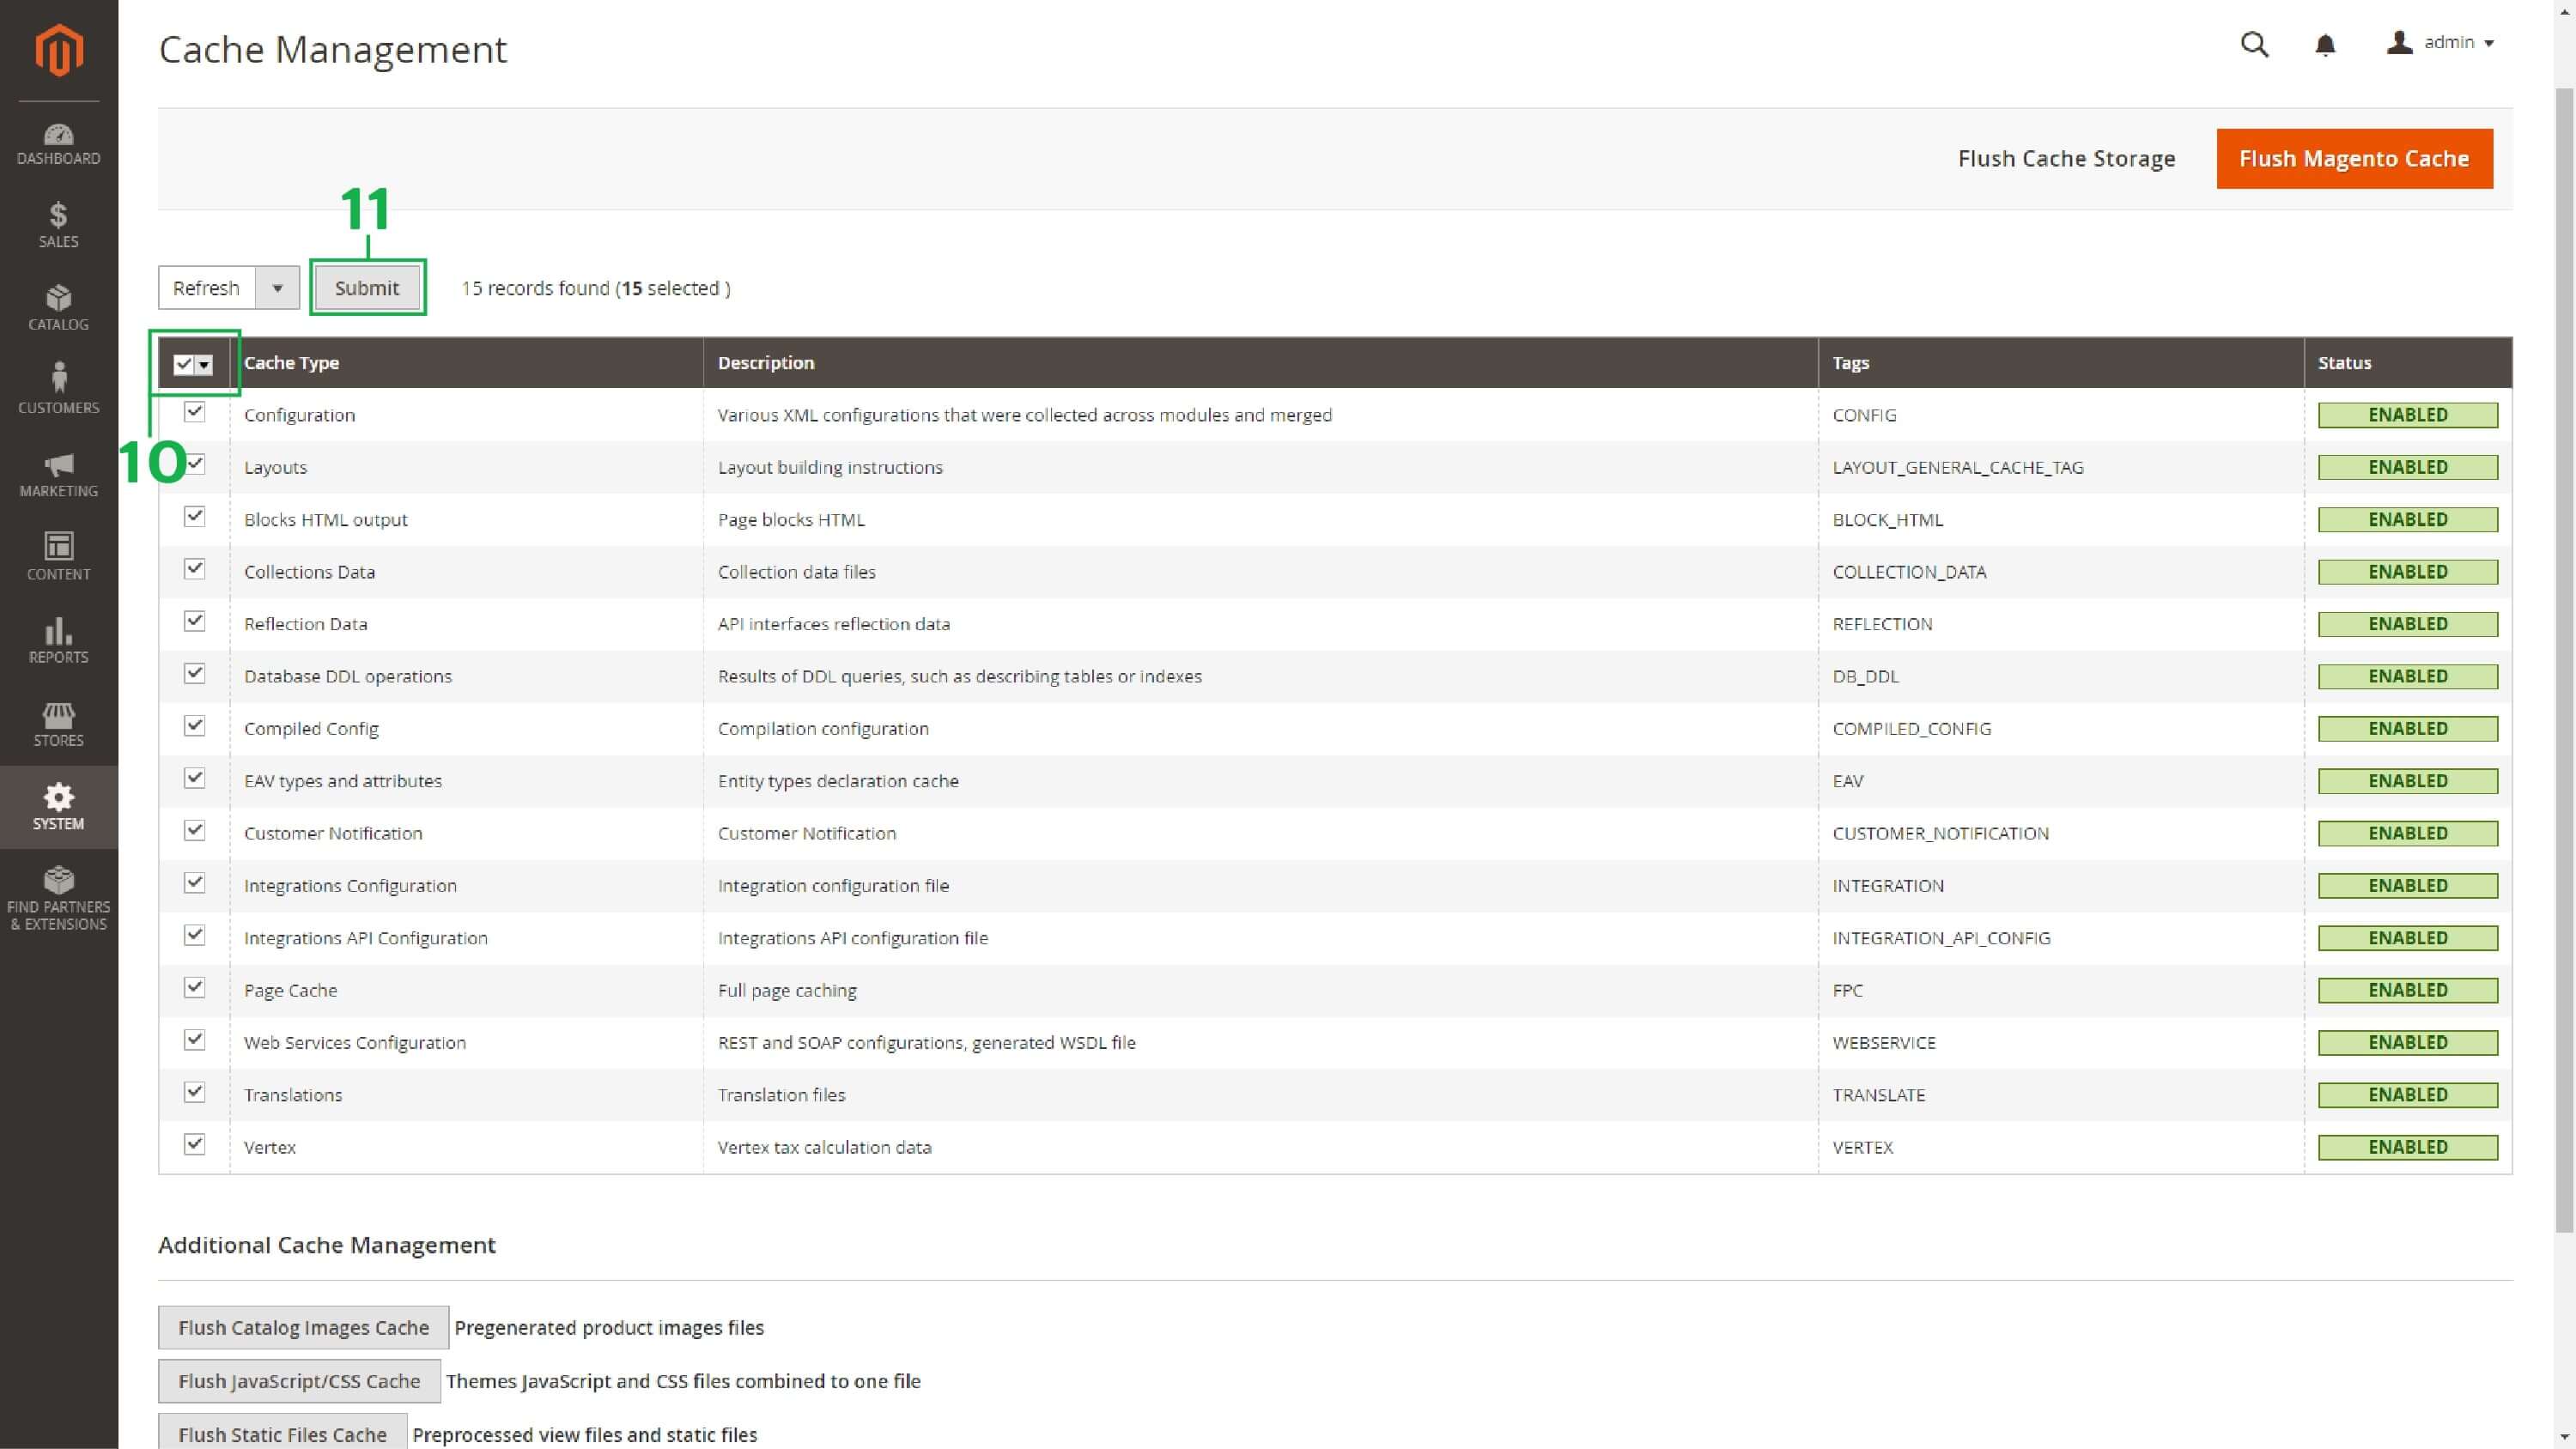
10. Navigate to System > Tools > Cache Management and select all cache types.
11. Click “Submit” to flush the selected cache types.
Now that you’ve added the Google Analytics global site tag to your Magento store, it’s time to verify if it’s working correctly.
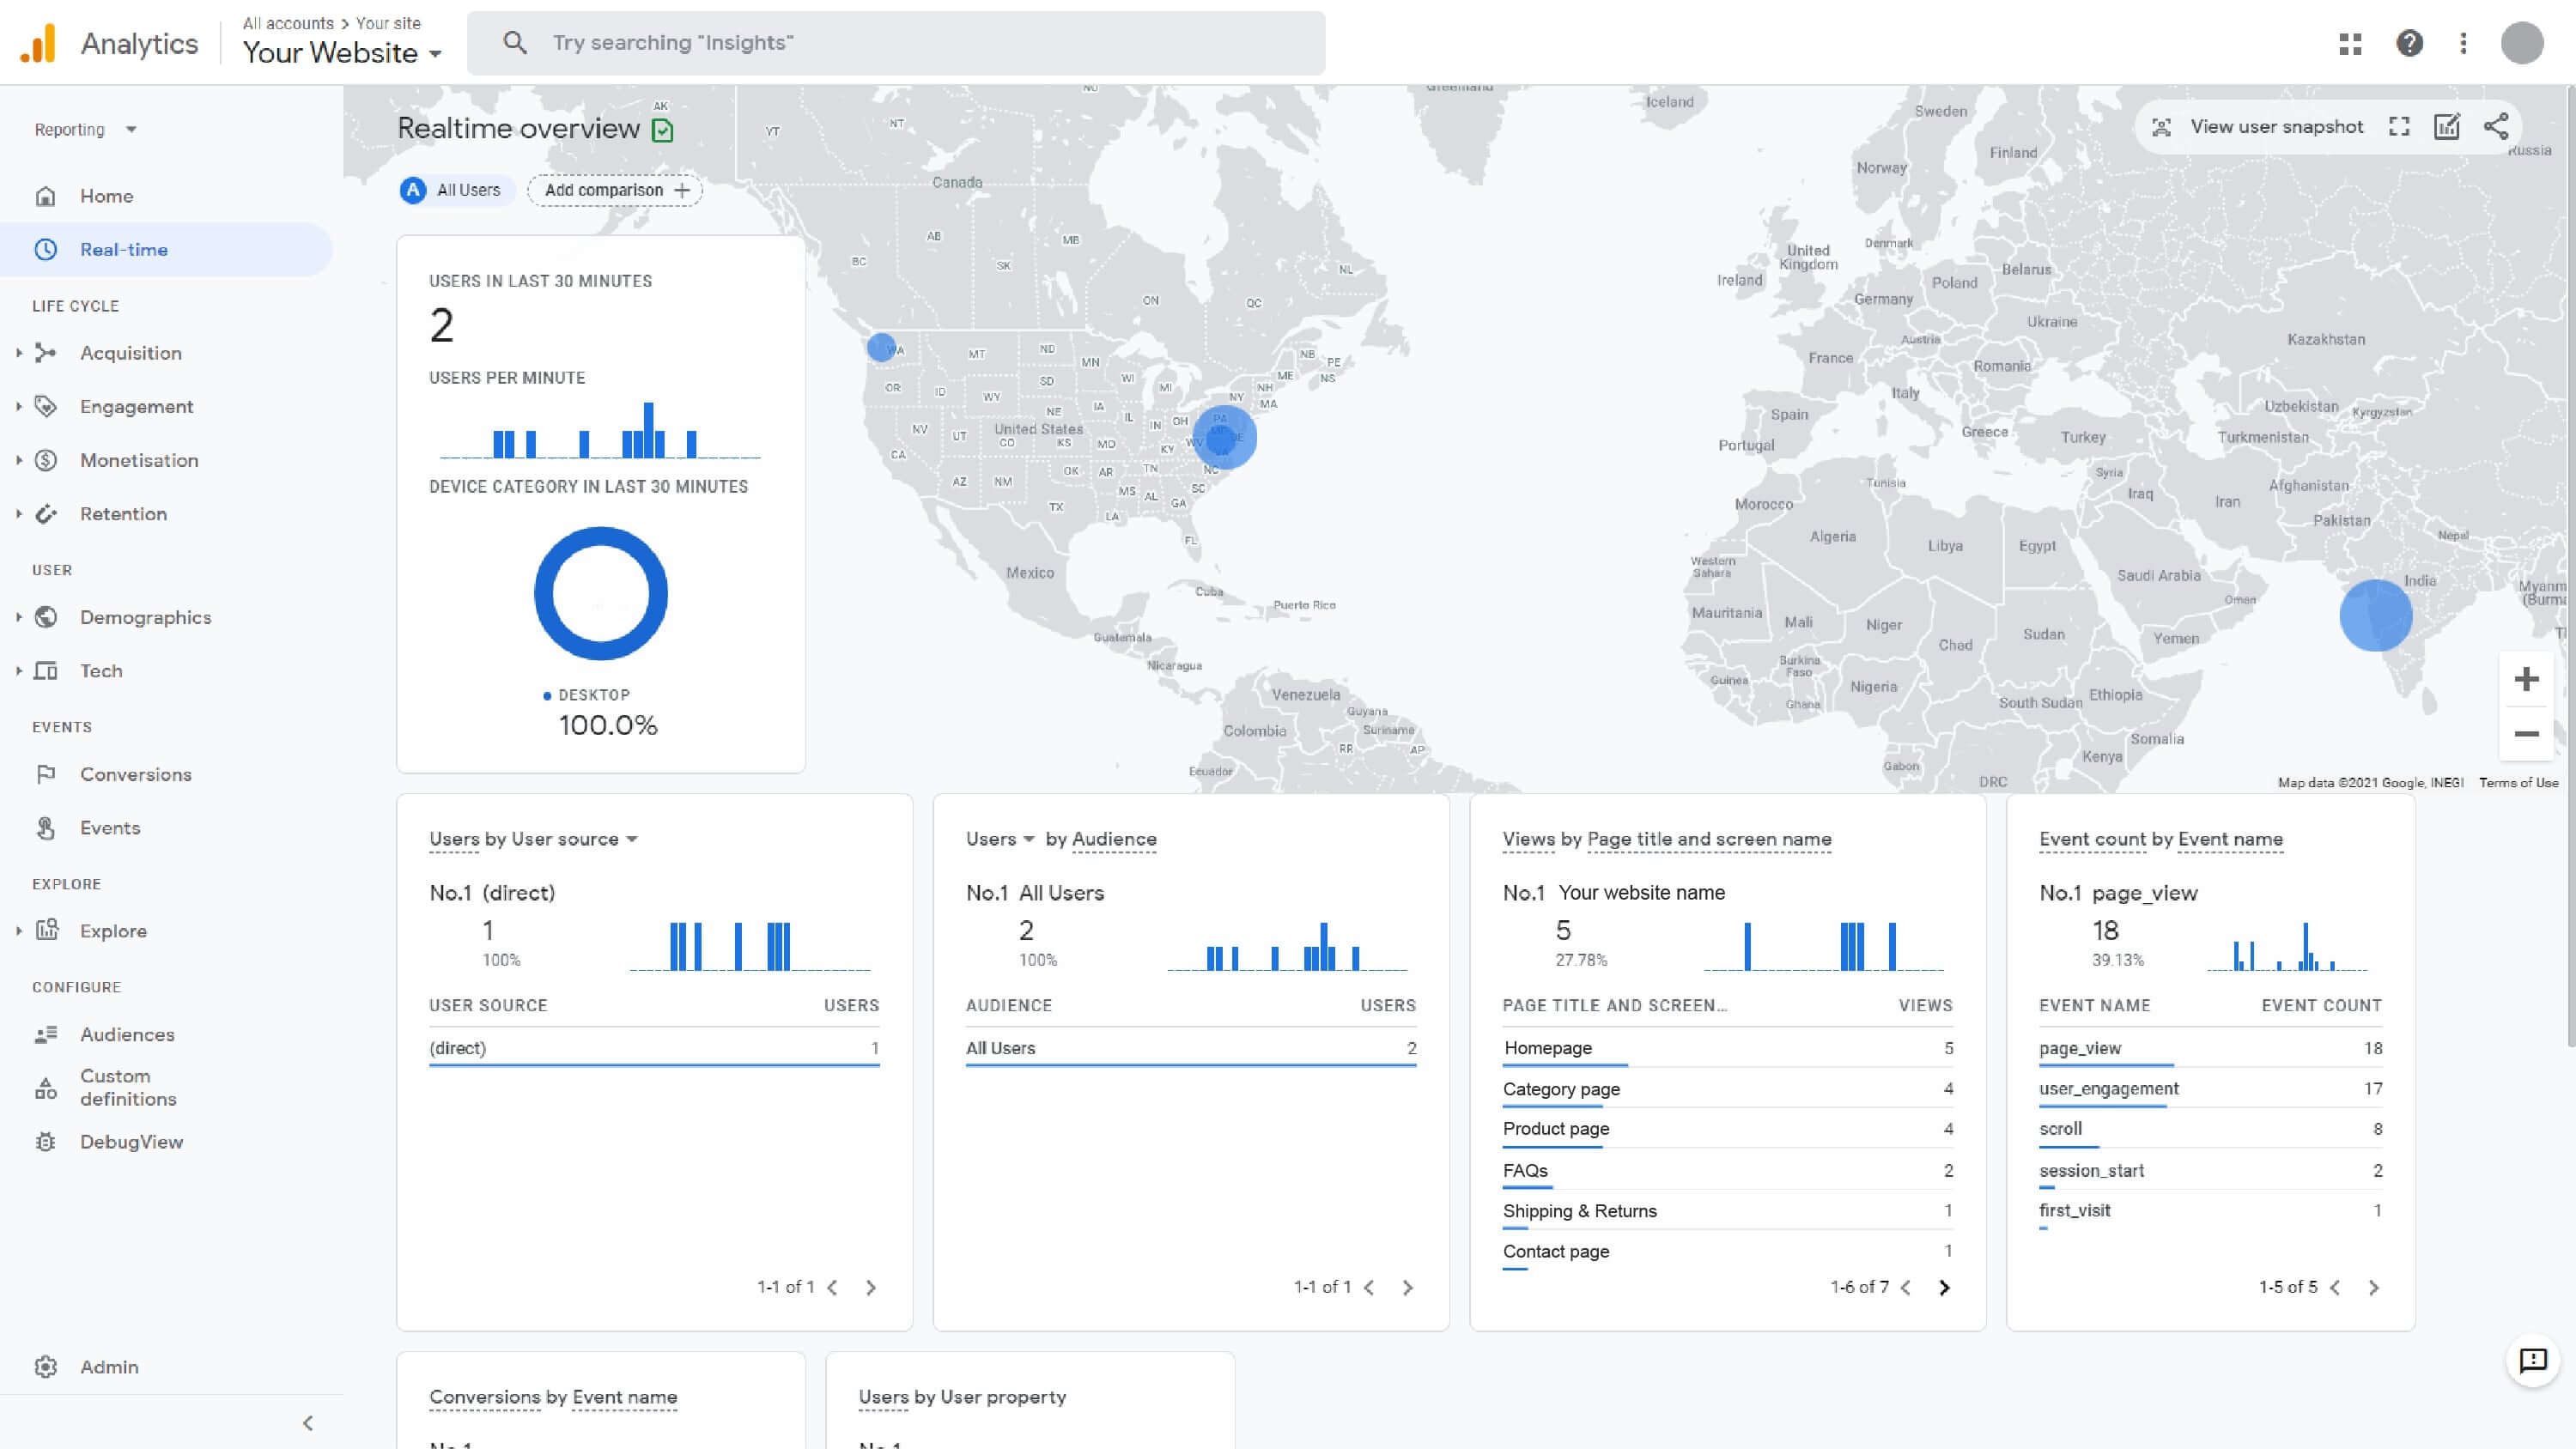
Step 4: Verify it’s working
You can verify if the global site tag is deployed correctly by checking your website’s real-time analytics.
Open the Google Analytics dashboard and head to the Real-time overview section. You should be able to see any live visitors on your website (including yourself).
If you can’t see any live website visitors, check for the following issues:
1. Ensure you aren’t using any ad blockers on your website.
2. Ensure you’ve pasted the code from your Google Analytics account, as demonstrated above.
3. If everything else looks good, flush your website cache.
You should start seeing live visitors in your Google Analytics account now.
Need more insights?
Now that you’ve successfully installed Google Analytics on your Magento store, you can start tracking website visits, page views, and other vital metrics relating to your website performance.
If you want deeper insights, you can set up custom tags using the Google Tag Manager for custom events. You can also create a Google Search Console account and connect it with your analytics property to gather search performance data and improve website SEO.
Val Kelmuts is the Chief Executive Officer and Co-Founder at Staylime, an ecommerce design and development company headquartered in Redwood City, California. Val has 10 years of experience in custom software development, sales management, and business development. He is the Adobe Commerce sales accredited specialist, Shopify business certified expert, and PMI member.